Scheduled Campaign
- Smart Campaigns: consist of two segments Scheduled Campaign and Templates.
- For a successful scheduling and execution of a campaign using the Smart Campaign feature, it's essential to create and get a WhatsApp Template approved. Once the template with the correct category and type is approved, you can then utilise the "Smart Campaign" functionality to distribute the template to a large group of contacts.
- Smart Campaign Dashboard
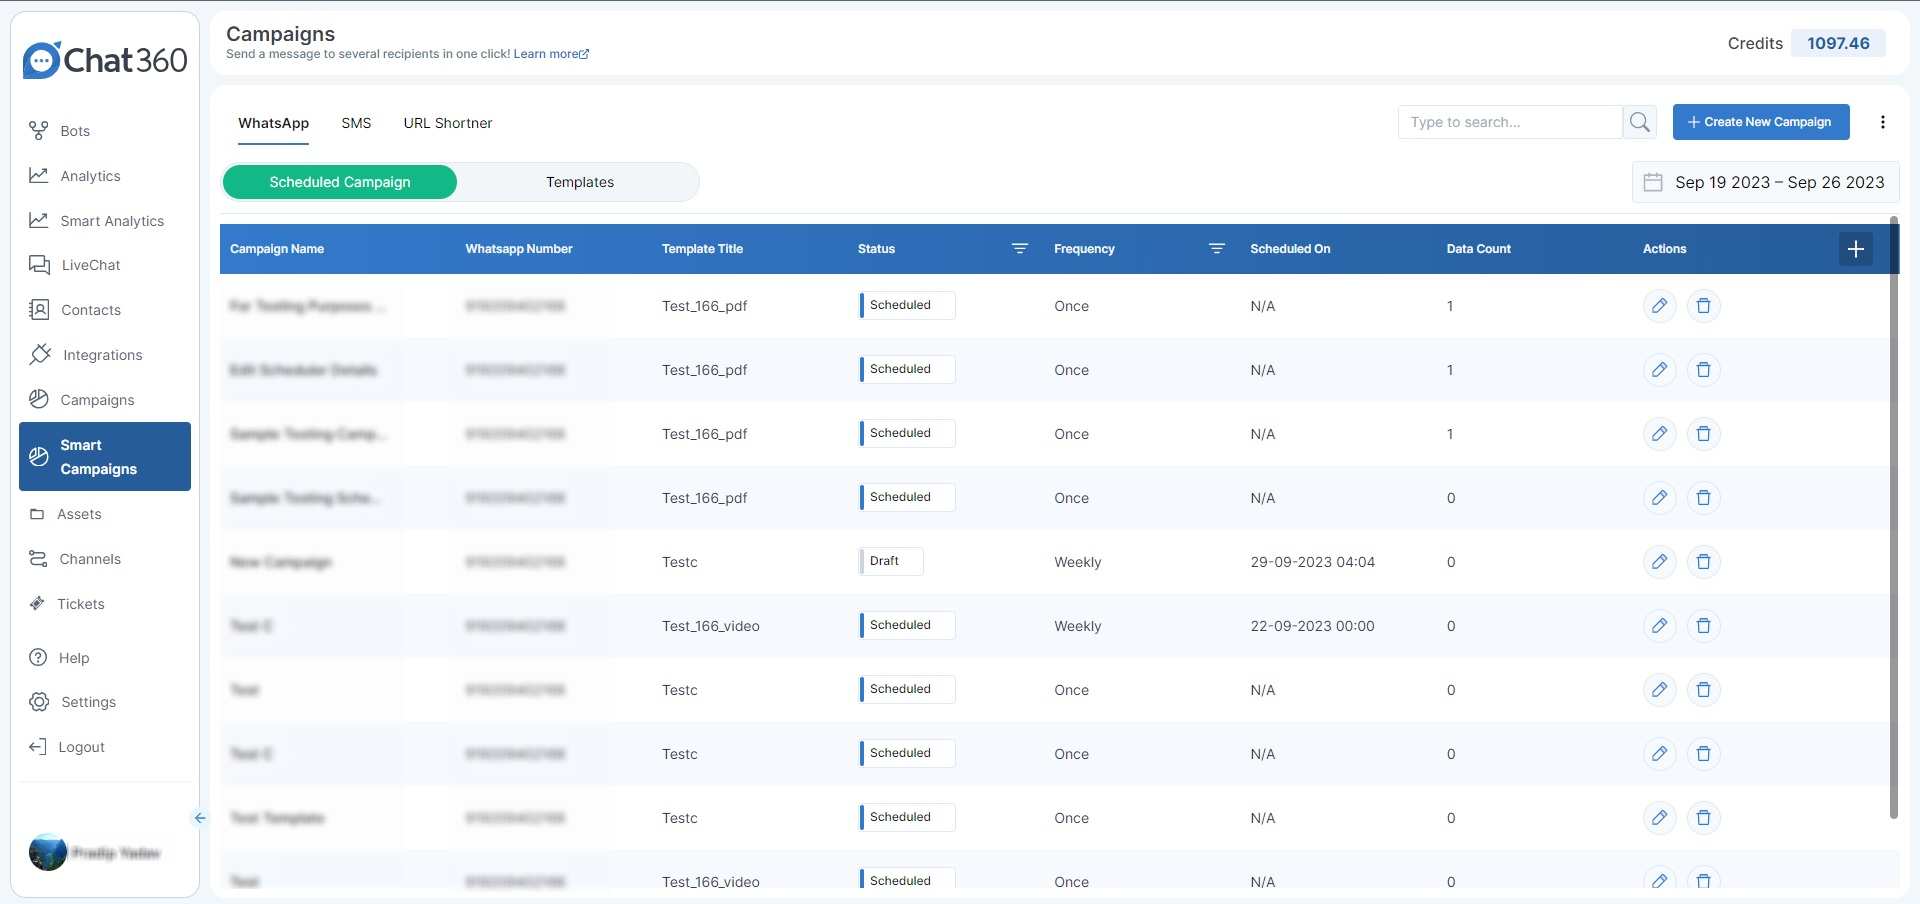
The Smart Campaign dashboard is divided into three sections: WhatsApp, SMS, and URL Shortener.
In the WhatsApp section, you'll find two main functions: "Schedule Campaign" and "Templates." "Scheduled Campaign" is used for launching campaigns on WhatsApp, while the "Templates" section allows you to create customised templates for use in Scheduled Campaigns. The Scheduled Campaigns Dashboard comprises a table that displays important scheduler and campaign details, including:
- Campaign Name: The name given to the campaign.
- Business Number: The number used for sending campaigns on behalf of the company.
- Template Title: The title of the template used in the campaign.
- Campaign Statuses: The current status of the scheduler (e.g., In Progress, Scheduled, Running, Completed or stopped).
- In Progress: This means your campaign is currently running, and messages are being sent out. You can also see how much of the campaign has been completed.
- Scheduled: If you've set up a campaign to start in the future, it will have a "Scheduled" status, meaning it's not active yet but will be at the specified time.
- Running: When a campaign is set to repeat daily, weekly, or monthly and has already run at least once, it's considered "Running." This shows that it's an ongoing campaign with a regular schedule.
- Completed: This status indicates that your campaign has finished, and there are no more scheduled runs in the future. It's all done and dusted.
- Stopped: This means that someone manually stopped the Immediate frequency campaign.
- Frequency: How often the scheduler runs according to the set frequency.
- Scheduled On: The date and time when the campaign is set to start.
- Data Count: The number of data entries imported.
- Actions: Choices for editing or deleting the scheduler.
- SMS section, you can create templates and send campaigns via the SMS channel.
- The URL Shortener tool allows you to generate short links. By clicking the "Create new URL" button, a prompt will appear where you can enter the campaign name, destination URL, and then click "Create" to generate the short link.
- Use WhatsApp's preset templates, which can include security details and expiration warnings.
- Add a one-time password button (copy-code or one-tap).
- Follow content rules: No URLs, media, or emojis are allowed in the template, and parameters must be no longer than 15 characters.
-
Scheduled Campaign:
- How to use Scheduled Campaign? Within the Scheduled Campaign dashboard, you'll find a "Create New Campaign" button. When you click on it, you'll be directed to the Create New Campaign page. On this page, you will need to go through four sequential steps to send a campaign:
- Provide Details: During the initial step, a form will appear for you to input the campaign details. This includes providing the campaign name and specifying the business number through which the campaign will be dispatched.
- Additionally, you will need to choose the template you want to use for the campaign. The selected template will be displayed on the right side of the screen, allowing you to configure the template fields and attach any desired media.
Within the Smart Campaign Dashboard, you can easily locate the Scheduled Campaign section. This particular section is dedicated to sending WhatsApp campaigns to bulk contacts all at once.
- Choose Recipients: Moving on to the following step, you'll need to import data into the campaign you've just created. This data should include the contact information of end users on which the campaign will be triggered. There are two methods for adding this contact data to the campaign:
Import data from contacts by filtering tags and attributes. To import contacts stored in the Contacts section, you should enable the Contacts section within the second step, "User Recipients". Here, you can choose the necessary tags, which will import contacts associated with the selected tag.
Moving to the next section, "Add Template Variables," you'll see Key-value pairs for the variables that need to be filled in. In the Key section, you can choose an attribute, and in the Value section, you can set a default value. This setup ensures that when a template is sent to a specific contact, the variable will retrieve the value from the attribute specified here. If the value is unavailable, the template will use the default value entered in the Value section.You can also include media by clicking the "upload media" button.
Finally, clicking "import data" will bring in the filtered contacts and configure the template variables accordingly.
Import contact data externally by attaching a Google Sheet. Within the "Import file" section, you can easily download a CSV format by simply clicking on the download button. After downloading, you can add the contact data to this CSV file. Then, click the "Import Data" button and select the CSV file where you've added the contact data. This action will import the data into the scheduler, allowing you to move on to the next step, which is the "Test" phase.
Map Parameters - Within the map parameter we can map the sheet, import a sheet and map the sheet variable with the Template variable to get the result. The process is simple just click on import and attach the file then the map parameter screen will show just map according to requirements you will get all the user recipients in the result.
Test: In the next step, you need to check if the right template, with the correct info and media, is set for the campaign. To help with this, there's a "perform testing" option where you can enter a WhatsApp number to review how the template will be sent. Once you're sure it's correct, you can proceed to launch the campaign.
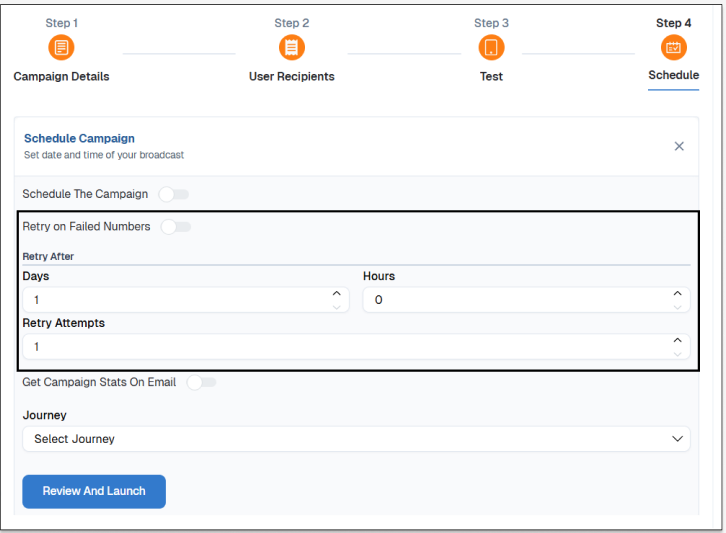
- Set a Schedule: In the last step, you'll configure the campaign's schedule by filling in the following fields:
- If the "Schedule the campaign" toggle is activated, you'll need to select the date and time when the campaign should be triggered.
- If the "Set Campaign Frequency" toggle is activated, you can specify the frequency through the prompt that appears when you enable it.
- If the "Get Response on Email" toggle is on, a field will appear where you should enter the email address to which campaign responses will be sent. You can enter up to three email addresses.
- Finally, there's a "Review and Launch" button. When you click it, a prompt will appear to review the campaign details before you hit the "Launch" button.
- You also have the option to save the edited campaign as a draft. This allows you to review it later, make changes if necessary, and launch it according to your requirements.
Campaign Retry Feature (New Feature)
Overview
- How To Setup:
- Schedule a campaign and proceed to the final stage.
- Enable the Retry on Failed Numbers toggle.
- Set the retry interval within 24 hours to 3 days.
- Define the maximum number of retry attempts (up to 3 times).
- The system will automatically retry sending failed messages based on the configured schedule.
- If a message fails due to Meta’s frequency capping, the system automatically retries the next day.
- This process continues for up to 3 days or until the message is successfully delivered.
- No manual intervention is required after setup.
The Campaign Retry Feature enhances the deliverability of WhatsApp marketing campaigns by automatically retrying failed messages. With the introduction of Meta’s Frequency Capping, many messages fail to send, reducing campaign effectiveness. This feature mitigates that impact by systematically retrying failed messages within a 24-hour to 3-day window, with up to 3 retry attempts, maximizing outreach and engagement.
- Key Benefits of Campaign Retry
- Increased Message Deliverability.
- Maximizes the number of successfully sent messages, boosting campaign performance and potential revenue.
- Automated Efficiency
- Eliminates the need for manual message resending, reducing operational workload and human errors.
- Ensures consistent retries in the background without marketer intervention.