WebEngage Integration
Step 1: Integrating WebEngage Platform with Chat360 Dashboard
- Accessing Integration Settings:
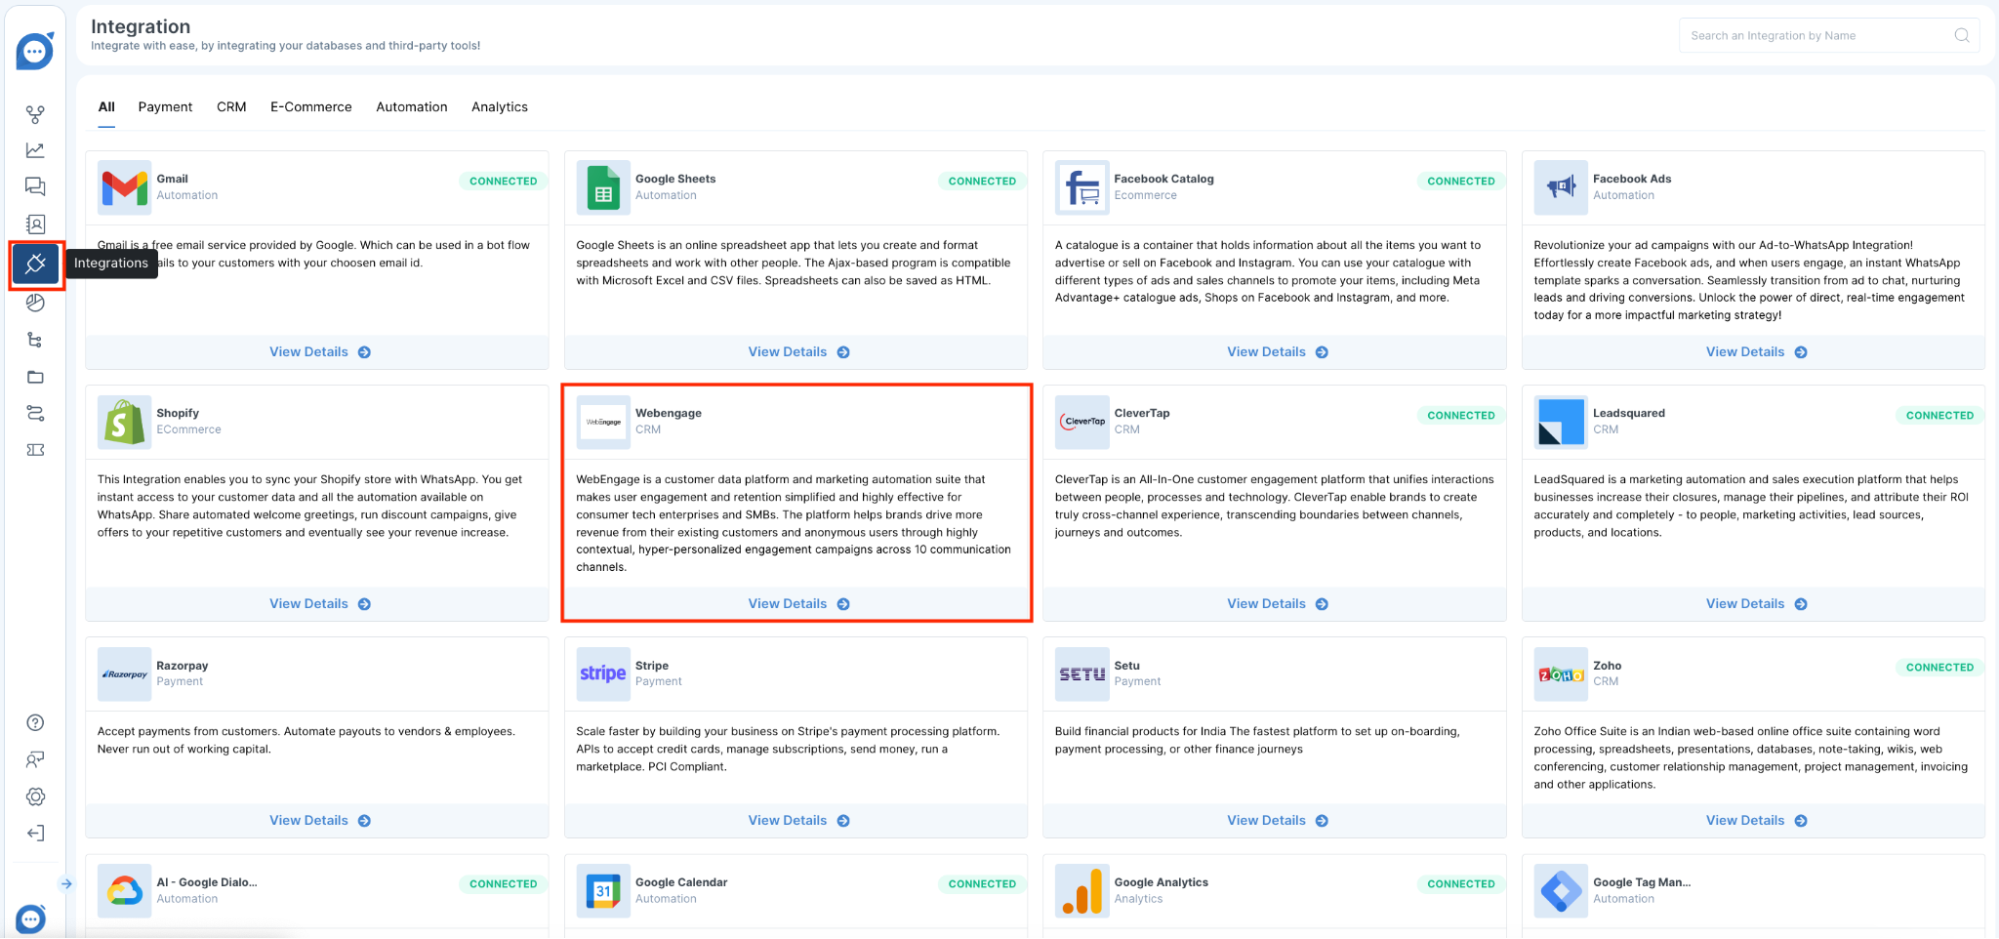
- Navigate to Integrations: Log in to your Chat360 platform. Look for the 'Integrations' section in the main menu. This section is where you can manage all external connections.
- Select WebEngage: Within the Integrations menu, find and select 'WebEngage' to begin the integration process.
- Adding Your WebEngage Account:
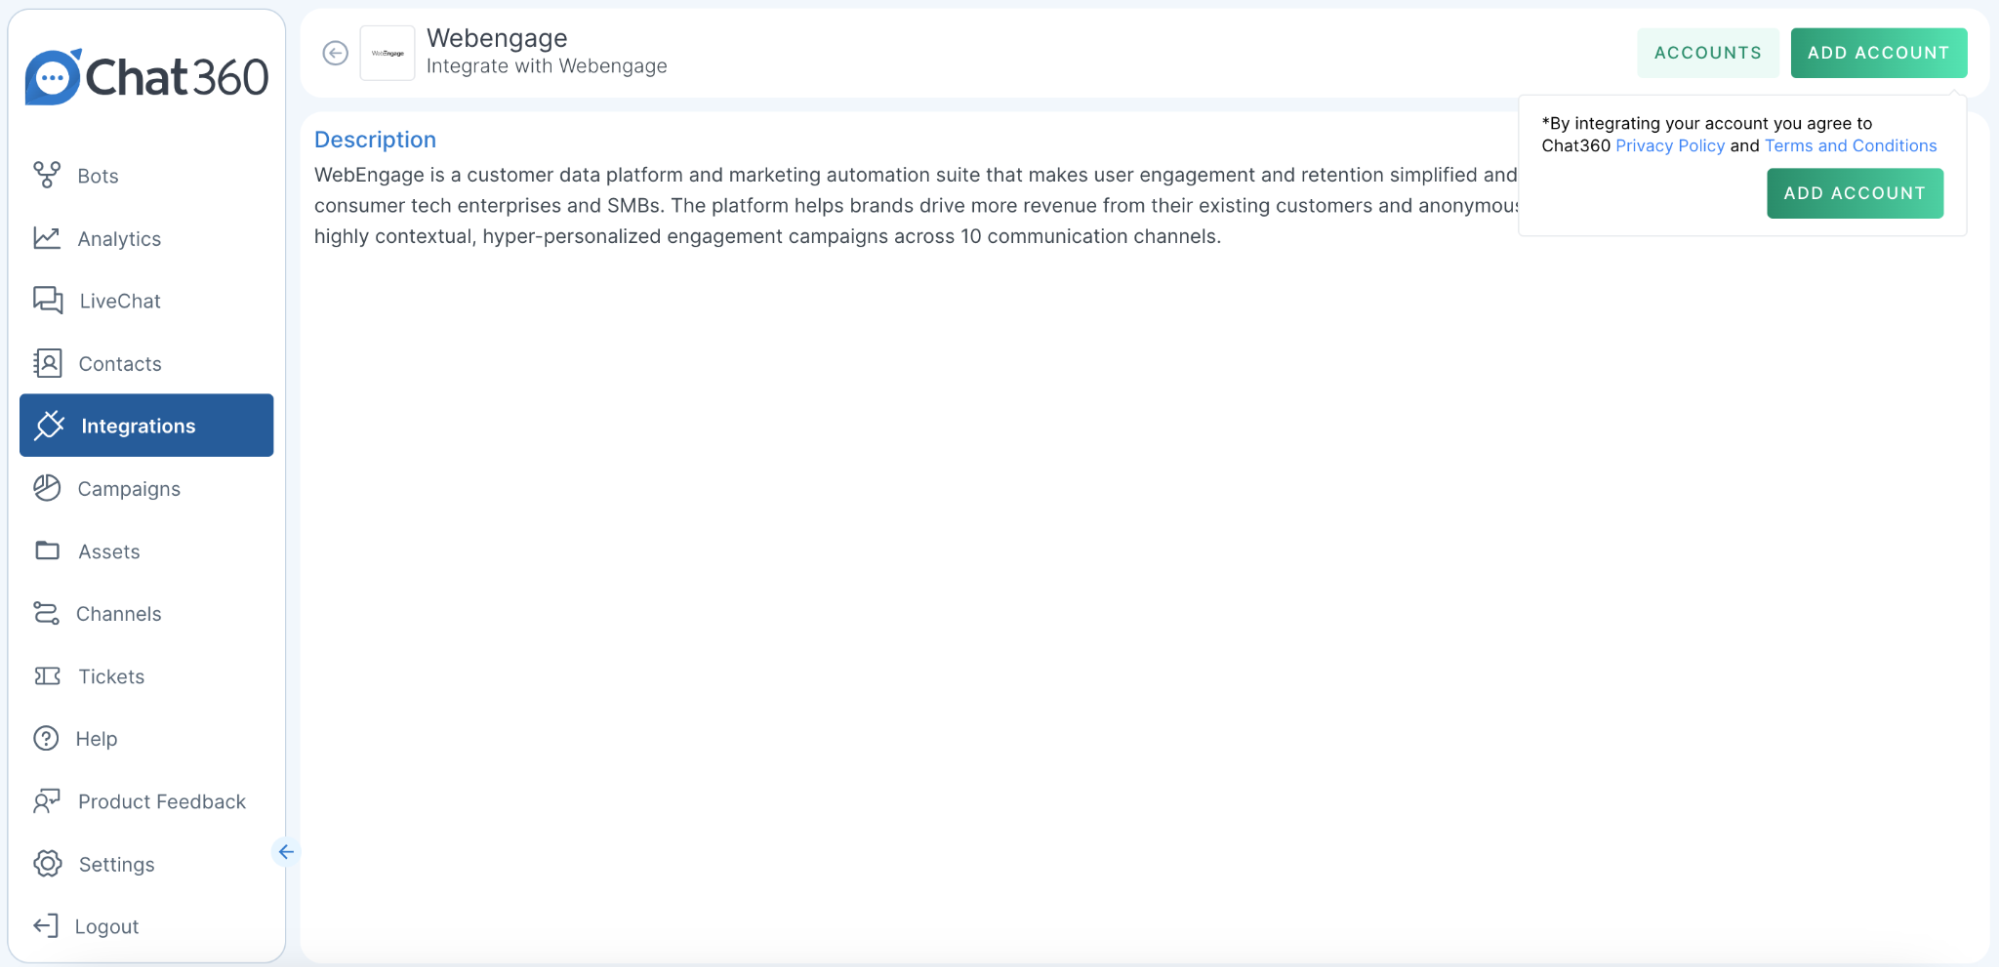
- Initiate Account Addition: Click on 'Add Account' to start the process of linking your WebEngage account with Chat360.
- Enter Account Details: You will be prompted to input your Business Account details. This includes the DNS API Key and Licence code, which you can obtain from the WebEngage developer's portal. Ensure these details are entered accurately to establish a successful integration.
- Configuring Integration on WebEngage:
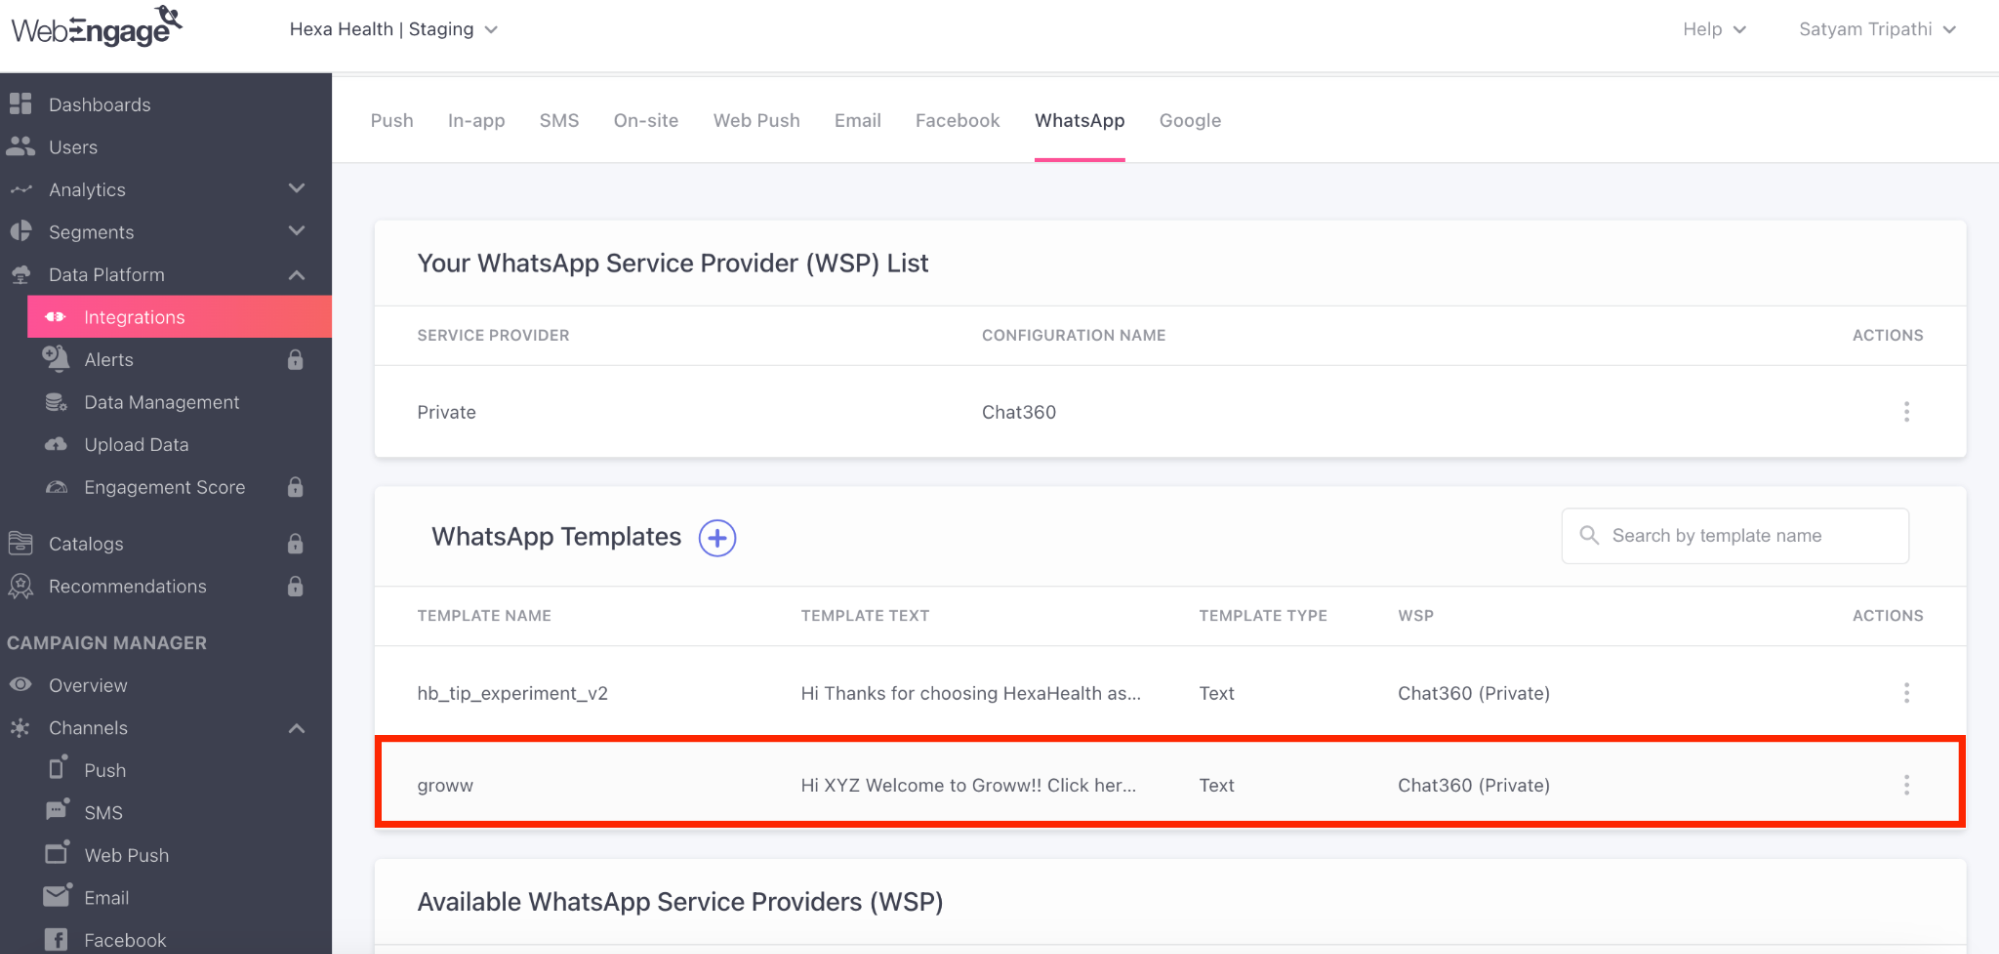
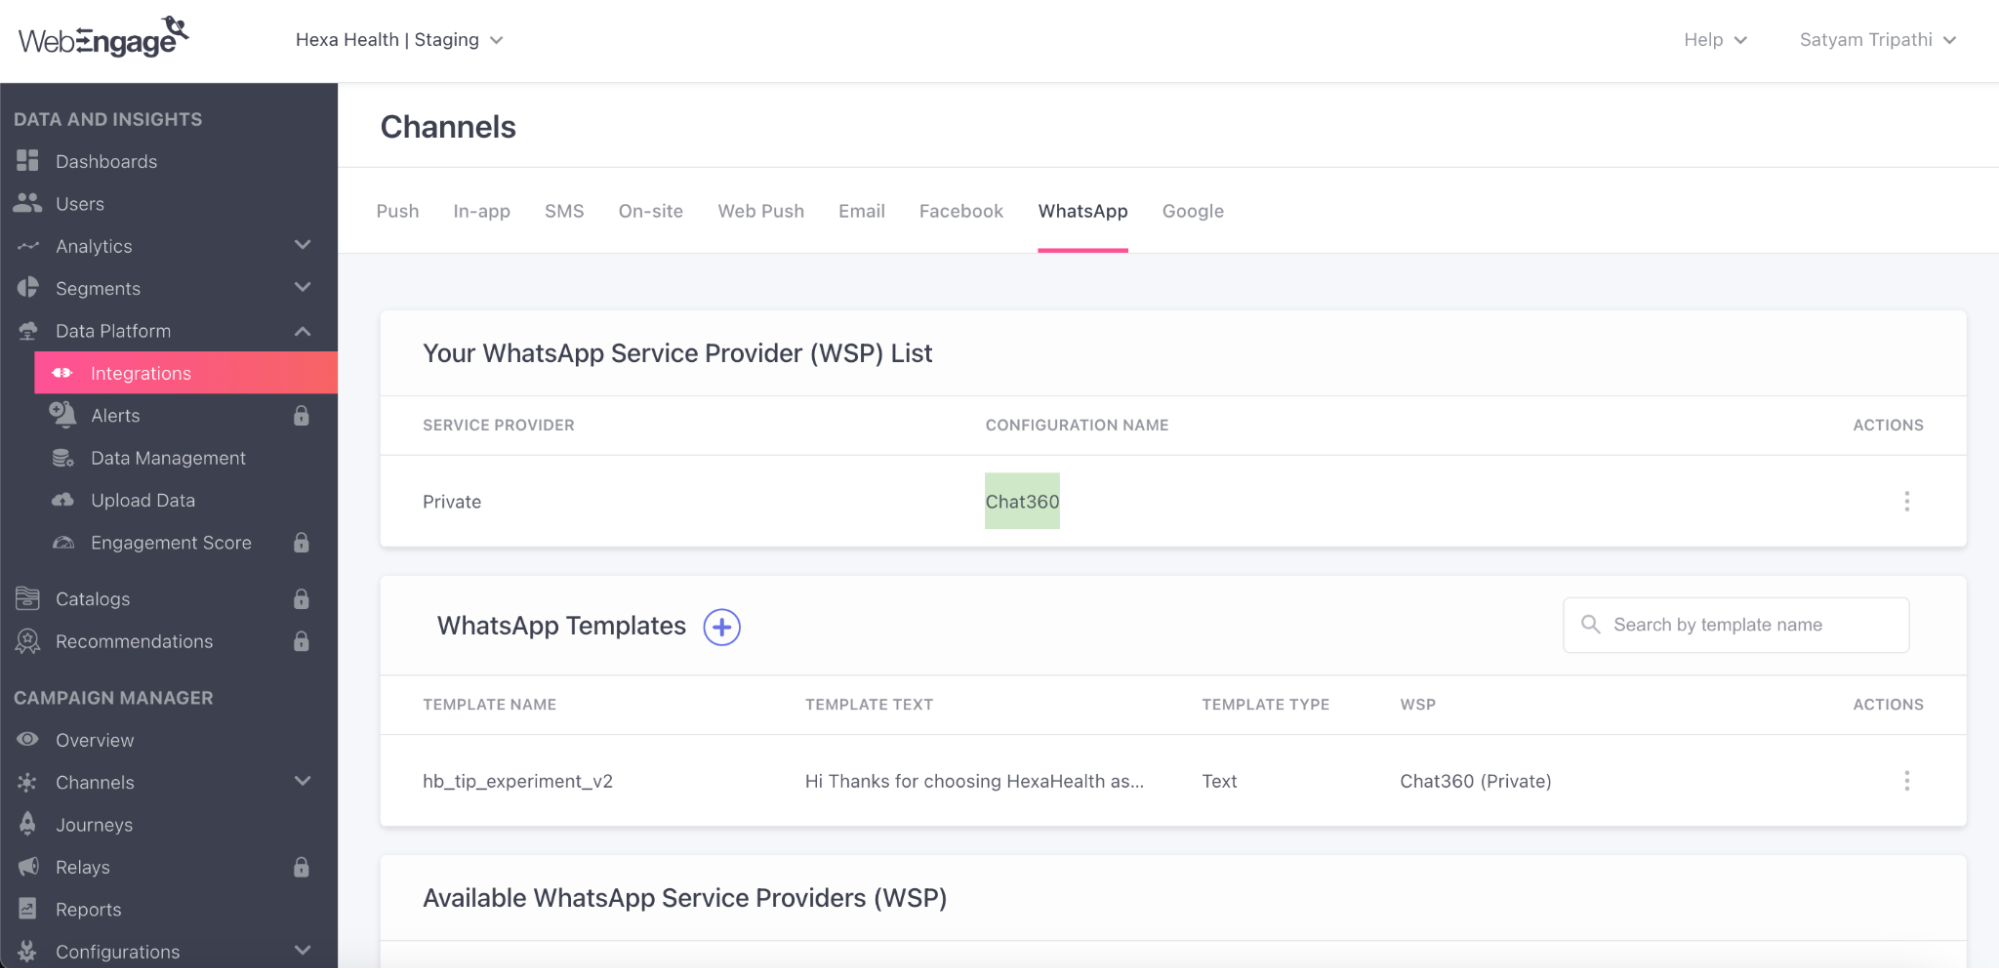
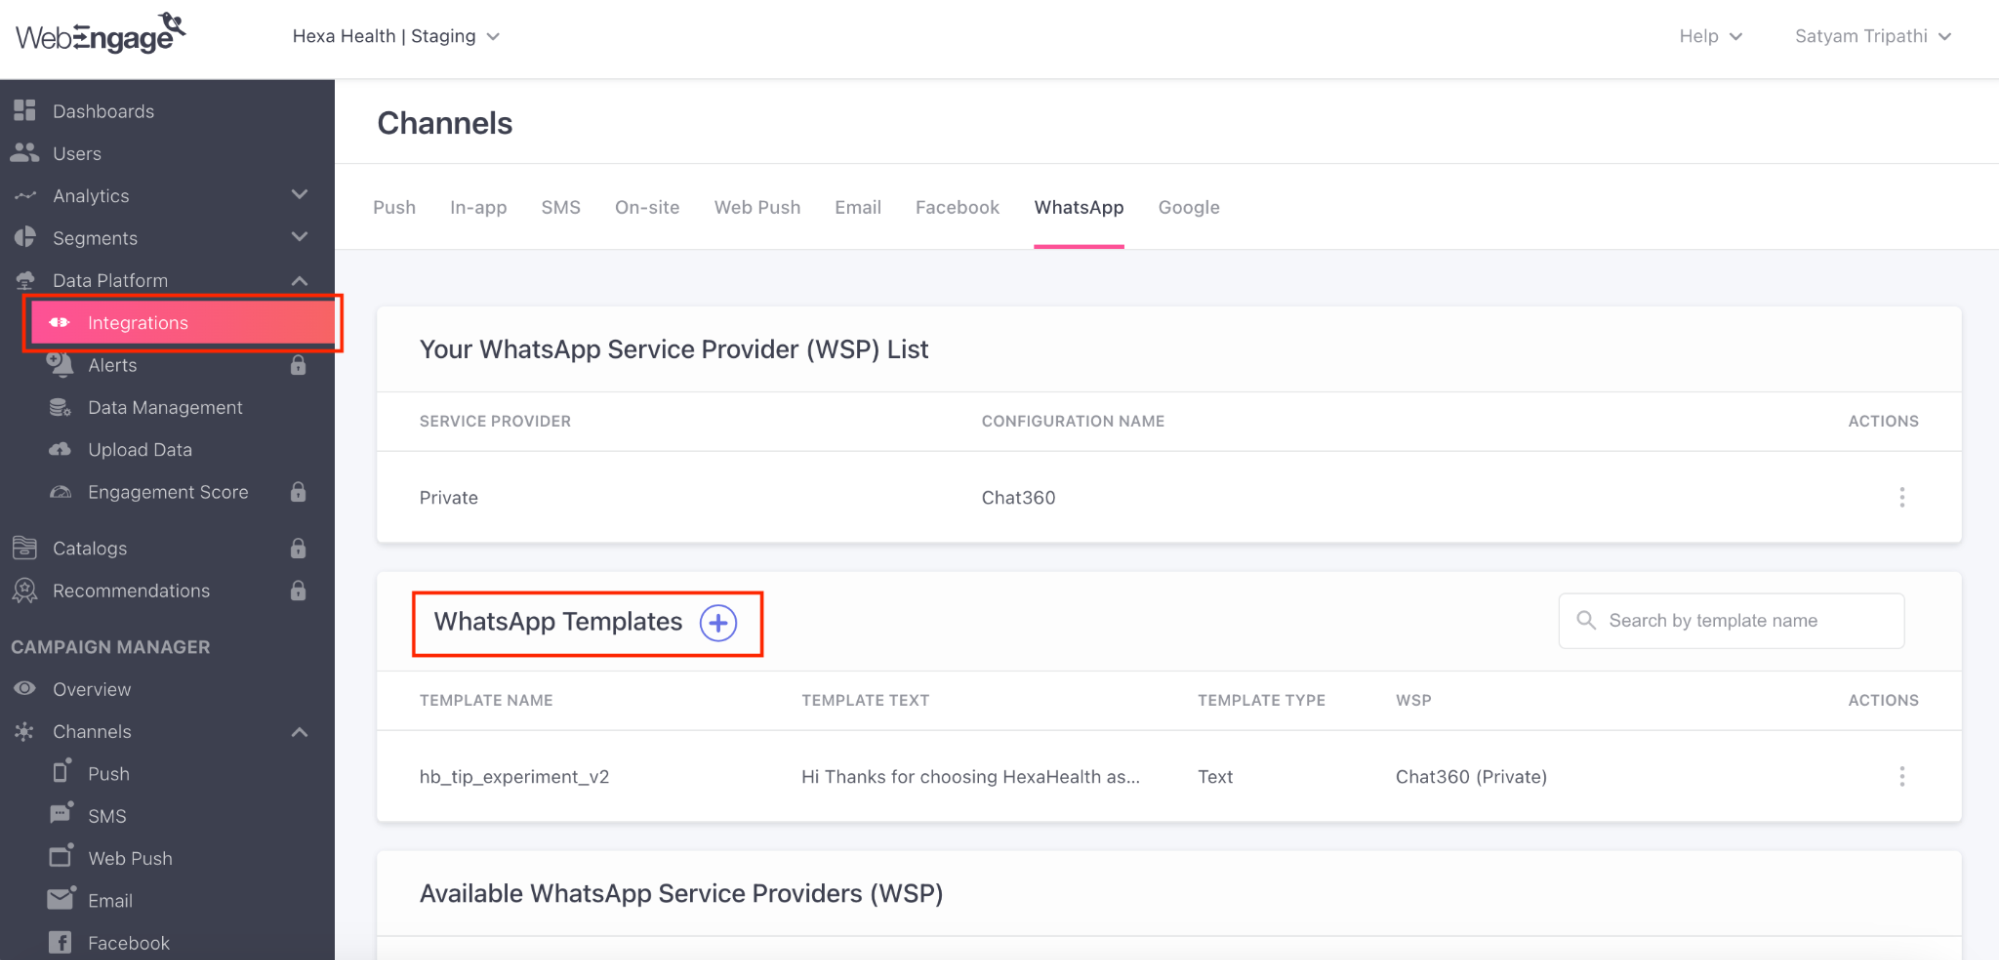
- Access WebEngage Integration Section: Switch to your WebEngage dashboard and navigate to the 'Integration' section. This part of the platform allows you to set up and manage integrations with other tools and services.
- Setup WhatsApp Integration: In the Integration menu, search for and select 'WhatsApp Setup' if you intend to launch campaigns via WhatsApp. This selection tailors the integration to handle WhatsApp communications effectively.
- Finalising Integration:
- Complete Configuration: Click on 'Configure' to finalise the integration settings between Chat360 and WebEngage. Follow the prompts to ensure all necessary configurations are correctly set up.
- Verify Integration Success: Upon completion, you will land on a confirmation page showing that the integration between Chat360 Dashboard and WebEngage was successfully established. This page confirms that all steps were correctly followed and that the systems are now linked.

Step 2: Creating a WhatsApp Template in WebEngage via Chat360 Dashboard
- Accessing Template Management:
- Go to Chat360 Dashboard: Start by logging into your Chat360 Dashboard. Navigate to the 'Campaigns' section where you manage your engagement strategies.
- Locate Templates: In the 'Campaigns' section, find the area dedicated to 'Templates.' This is where you store and manage all your messaging templates.
- Confirming Template Approval:
- Review Saved Templates: Examine the list of templates you have saved in the Chat360 Dashboard. Ensure that the template you plan to use for your campaign has been previously approved. This approval is crucial as only approved templates can be used for official WhatsApp communications
- Select Approved Template: Choose the template that best fits your campaign needs, ensuring it aligns with WhatsApp’s guidelines and has been approved for use.
- Integrating Template with WebEngage:
- Switch to WebEngage Platform: Log into your WebEngage dashboard and navigate to the section where you can manage WhatsApp templates.
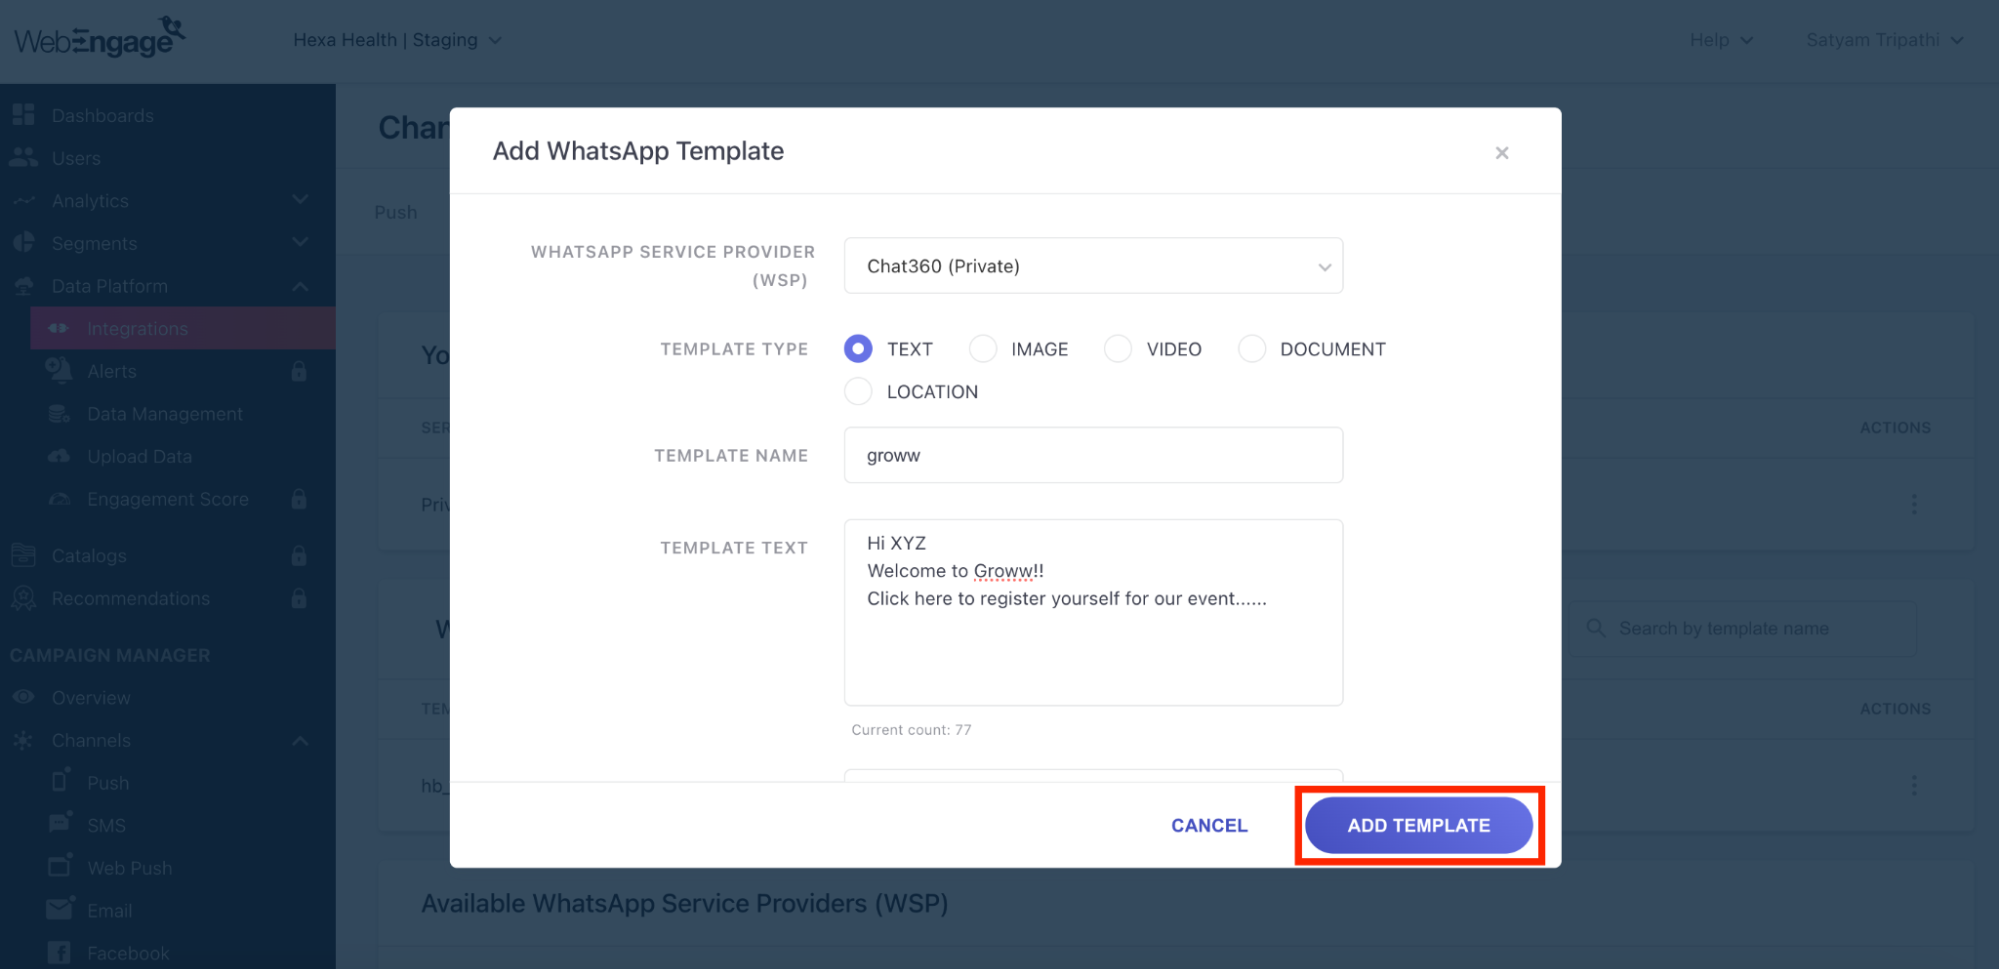
- Add WhatsApp Template: In WebEngage, proceed to add the template you’ve confirmed in Chat360. This involves matching the template ID or details in WebEngage to ensure consistency across both platforms.
- Finalising Template Setup:
- Complete Template Integration: After adding the template in WebEngage, ensure it reflects the same configurations as set in Chat360. This includes message format, media inclusion, and compliance with WhatsApp’s messaging policies.
- Verify Template Availability: Confirm that the newly added template is visible and active within WebEngage. This verification is important to ensure that the template is ready for immediate use in campaigns.
Step 3: Launching a WhatsApp Campaign in WebEngage
- Accessing Campaign Manager:
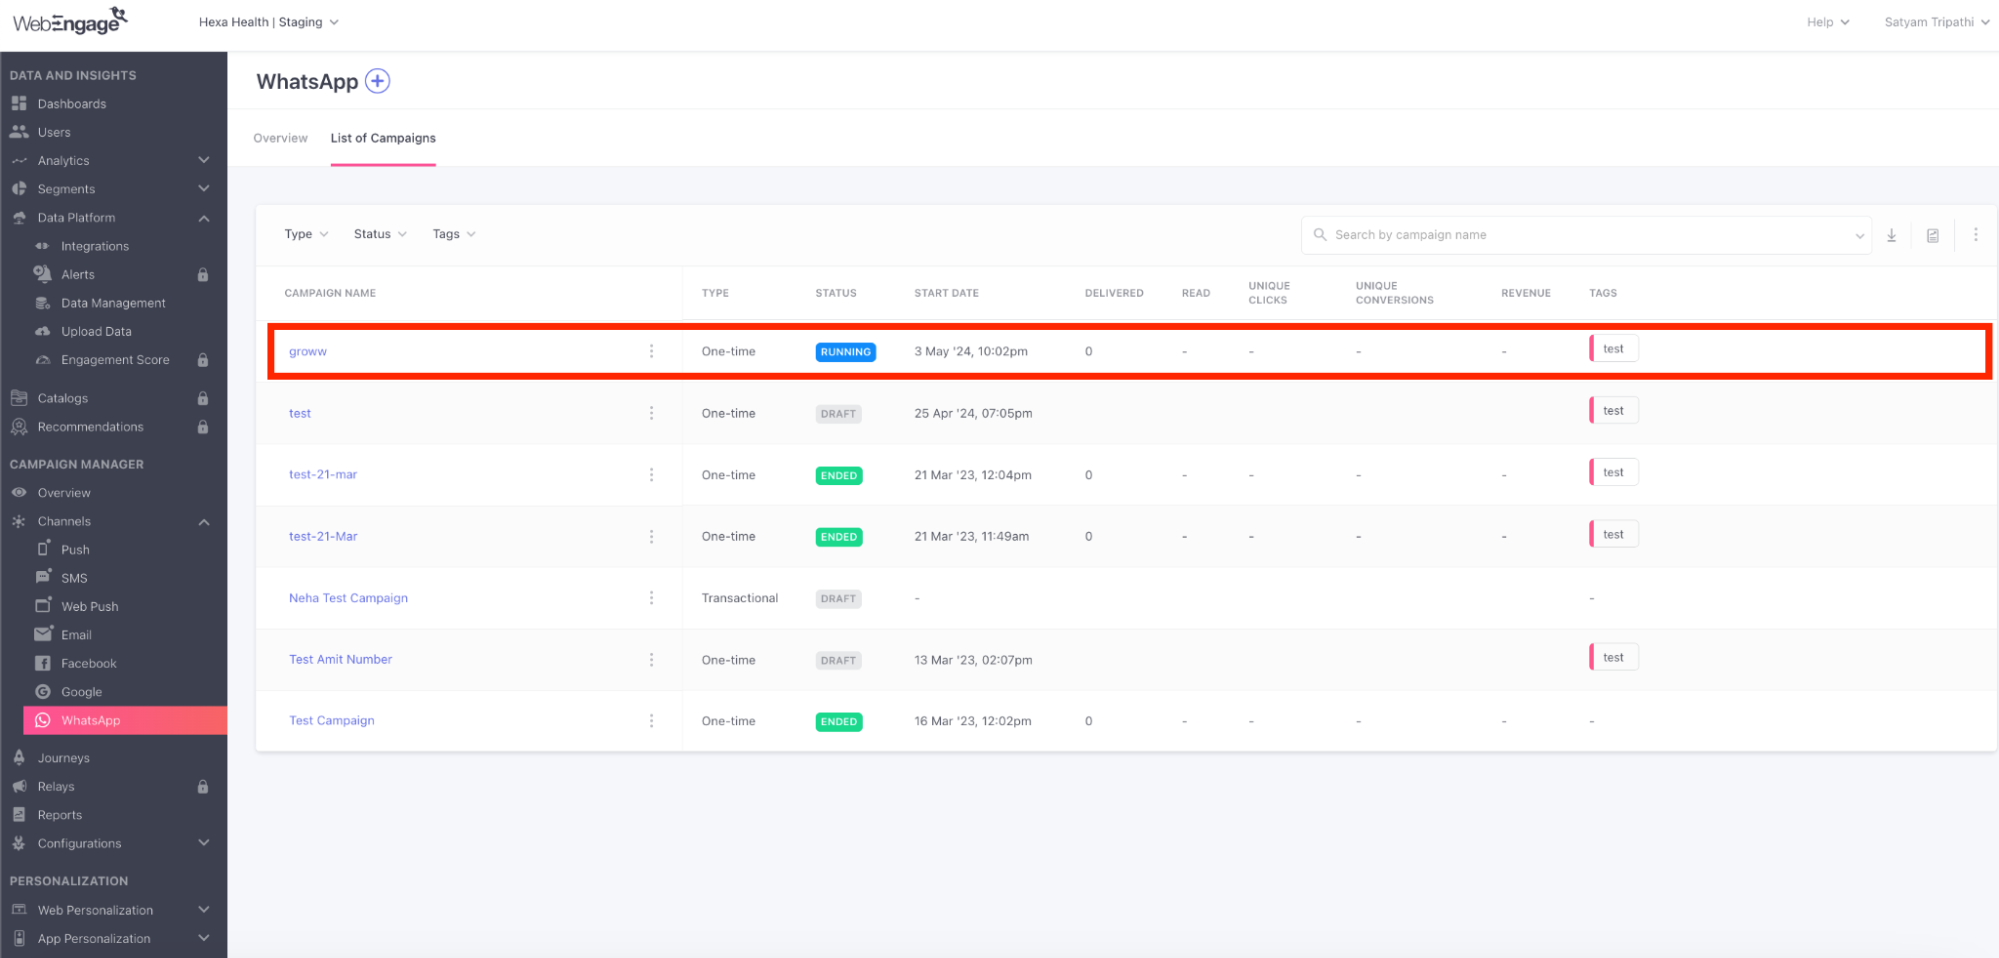
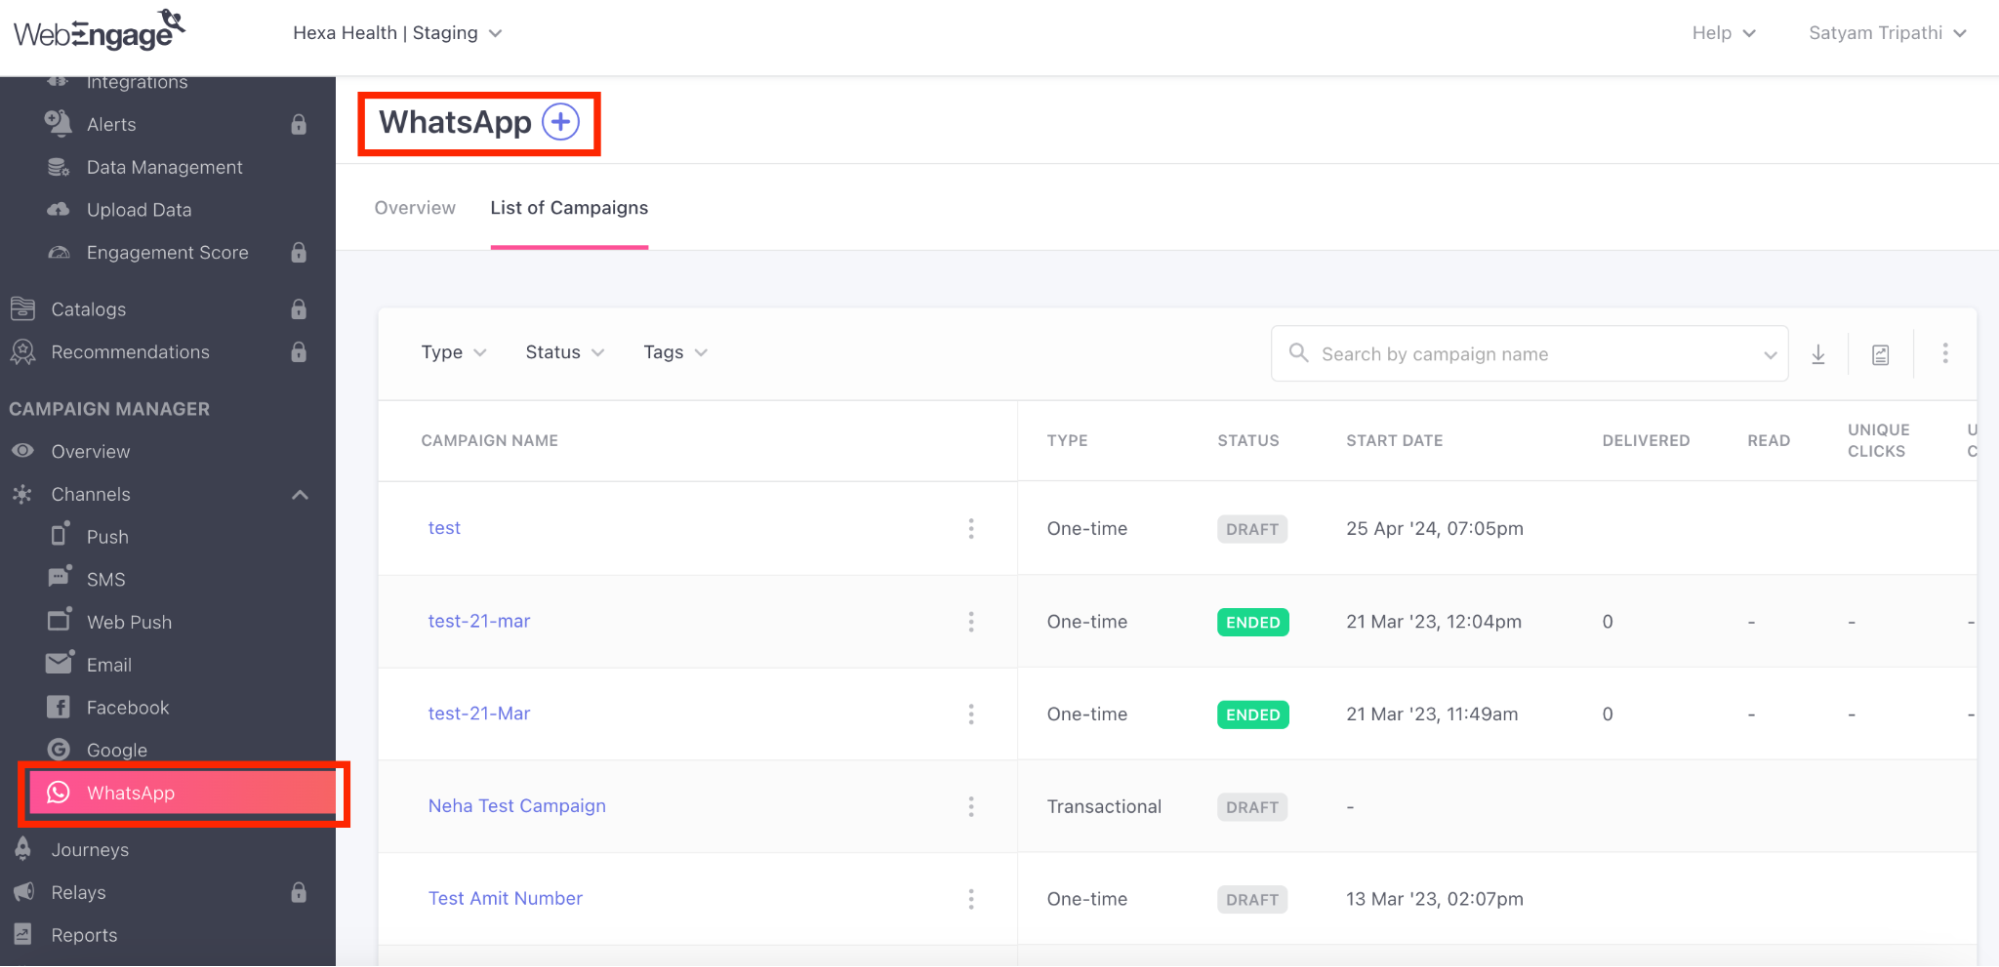
- Navigate to Campaign Manager: Log into your WebEngage dashboard and locate the 'Campaign Manager' section. This area allows you to oversee all your marketing campaigns.
- Initiate WhatsApp Campaign: Within the Campaign Manager, find and select 'WhatsApp'. Look for the "+" sign beside the WhatsApp option, indicating the ability to create a new campaign.
- Setting Up Campaign Details:
- Create New Campaign: Click the "+" sign to start configuring a new WhatsApp campaign. You will be prompted to enter various campaign details. Enter Campaign Name: Specify a unique name for your campaign to easily identify and track its performance.
- Select Audience: Determine whom you want to send the campaign to. This decision should be based on your segmented audience data.


- Uploading and Applying User Data:
- Upload User Data: If you haven’t already uploaded your audience data, go to the 'Data Manager' under 'Upload data'. Follow the prompts to add user data.
- Download Sample CSV: For reference, you can download a sample CSV format which helps ensure your data is in the correct format required by WebEngage.
- Return to Segment Section: After uploading, navigate to the 'Segment' section. Here, you can manage and select the specific user data (e.g., user IDs) for the campaign.(The sample of the data is mentioned below)
- Finalising Campaign Setup:
- Review Campaign Plans: Once back in the Campaign Manager, proceed to the 'Create WhatsApp Campaign' section to review your plans.
- Select Your Prepared Campaign: Choose the campaign you’ve set up, ensuring all details, including the message template and target audience, are correct.


- Testing and Launching the Campaign:
- Test Your Campaign: Before the final launch, it’s critical to test your campaign. Edit the sender number to send a test message and ensure everything works as expected.
- Launch Your Campaign: Once you confirm all settings are correct and the test is successful, finalise and launch your campaign.
- Monitor Campaign Launch: After launching, observe the campaign's initiation and execution to ensure it runs smoothly.


- Tracking Campaign Performance:
- Access Analytics: To monitor the success and impact of your campaign, go to the Chat360 'Analytics' section.
Thank you for your feedback!
We appreciate your feedback!