Web Push Notifications
-
Overview
Web Push Notifications are short, real-time messages delivered directly to users’ browsers, engaging them even when they’re not actively on your site or app. Supported by all modern desktop and mobile browsers, these alerts require opt-in consent, ensuring you reach an already interested audience without needing email or phone details.
-
Key Features
- Real-Time Delivery: Instantly notify users about updates, offers, or reminders.
- Cross-Platform Support: Compatible with Chrome, Firefox, Safari, Edge, and more.
- Permission-Based: Only reaches users who have explicitly opted in, boosting engagement rates.
- Browser-Tied: Relies on browser subscriptions—no dependence on personal contact information.
- Personalization: Dynamically insert user names, preferences, or session data for tailored messaging.
- Offline Queueing: Stores notifications and delivers them when the user next comes online.
-
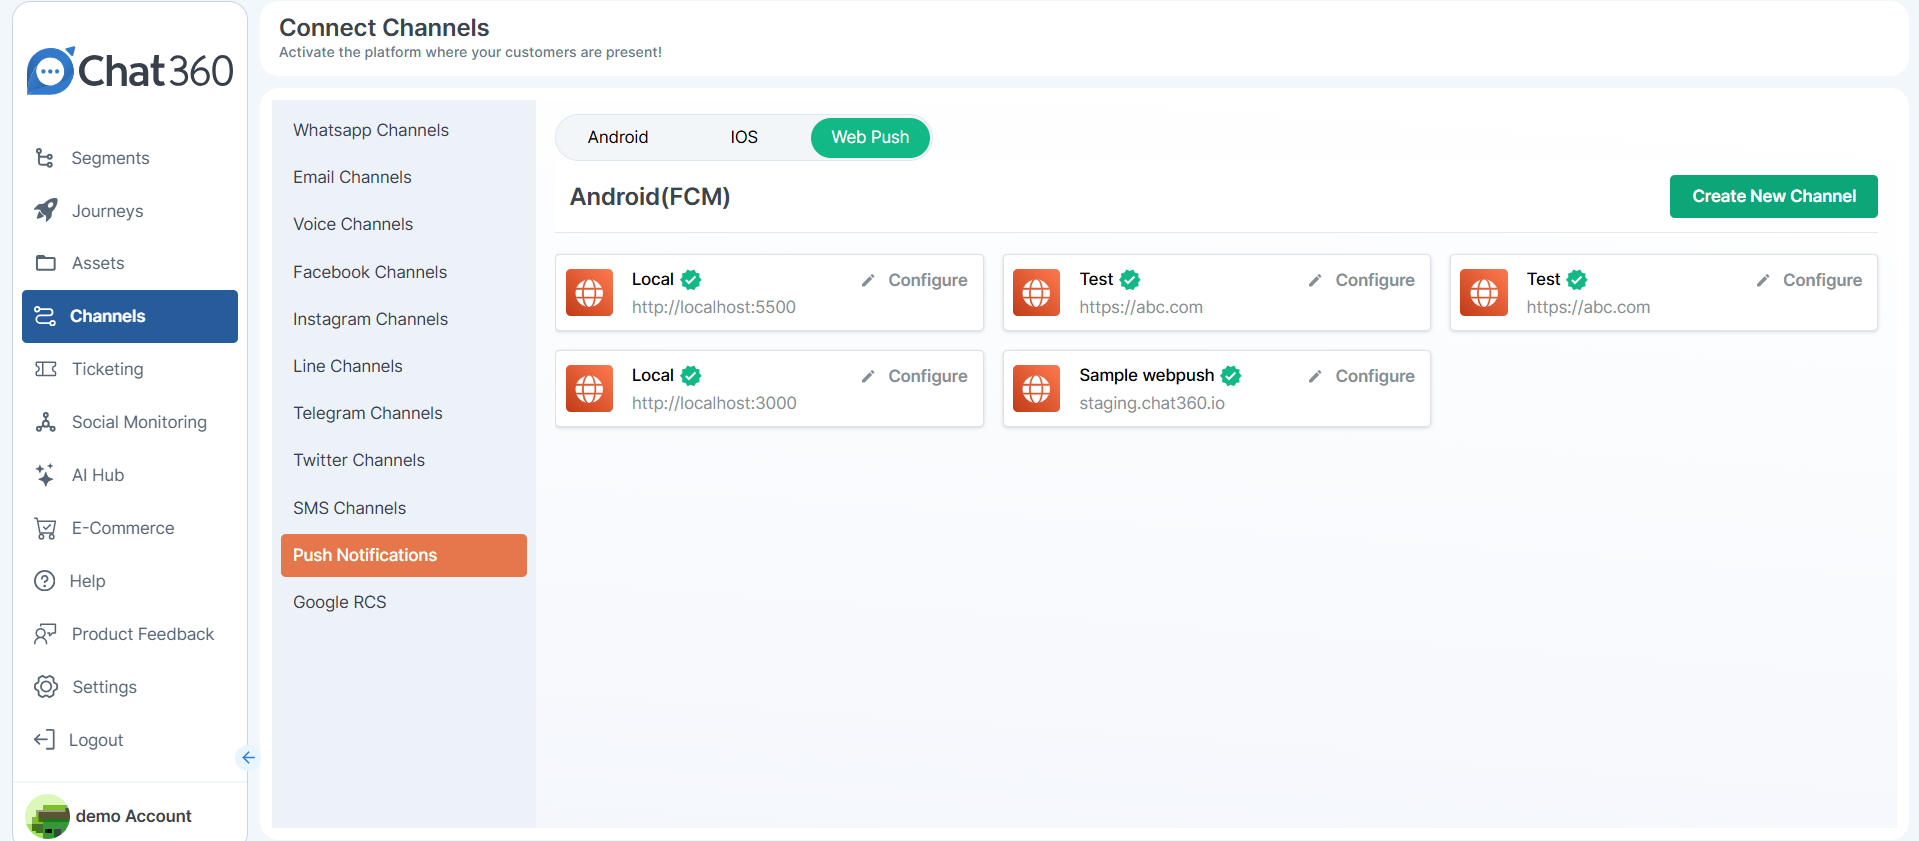
How to Create a New Web Push Channel
- From your Chat360 dashboard, open the Side Panel and select Channels → Push Notification.
- Click Create New Channel, then choose Web Push from the options.
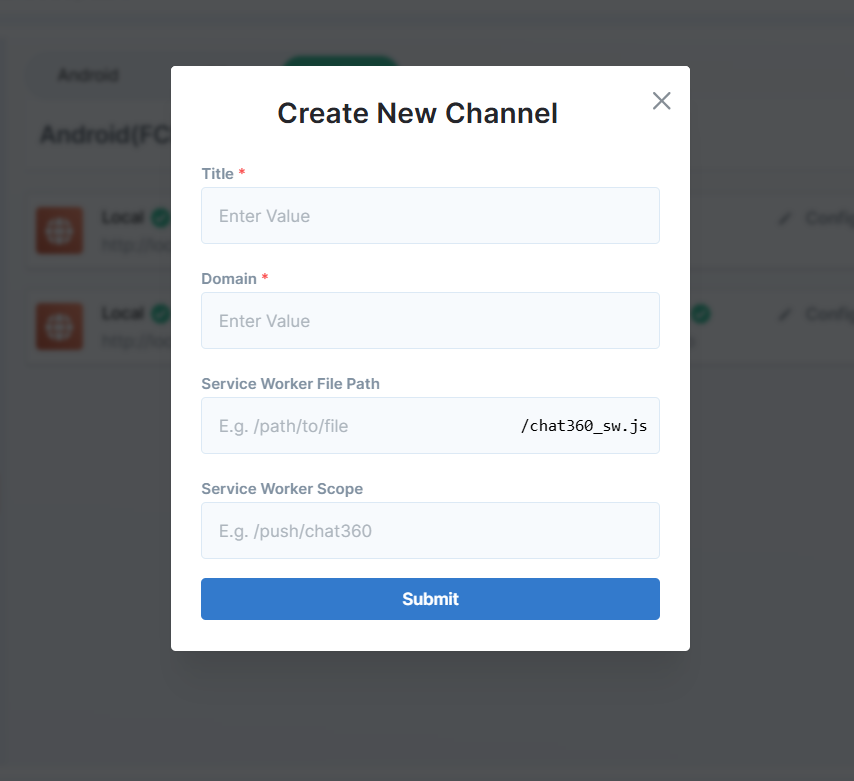
- Enter the Domain Name where notifications will appear.
- Specify the Prompt Settings (e.g., automatic or delayed permission request).
- Service Worker File Path: e.g., /sw.js
- Service Worker Scope: e.g., / or /notifications/
-
1. Access Channels:
-
3. Configure Domain & Permissions:
-
Review & Save
- Verify all settings for accuracy, then click Save to activate the channel on your site.
-
Use Cases
- Cart Abandonment Reminders: Nudge shoppers who left items in their cart back to complete checkout.
- Breaking News Alerts: Instantly inform subscribers of critical updates or time-sensitive announcements.
- Event Countdown: Send timely reminders leading up to webinars, sales events, or product launches.
- Re-Engagement Campaigns: Reconnect dormant users with personalized offers or content highlights.
Enable Web Push to keep your audience informed, increase return visits, and drive timely actions—without ever needing their email or phone number.
-
Web Push Notification Template Creation
OverviewPush notification templates let you design and standardize real-time web alerts that engage users with a consistent look and message. Once approved, these templates can be reused across campaigns to ensure brand alignment and faster deployment.
-
Configuration Steps
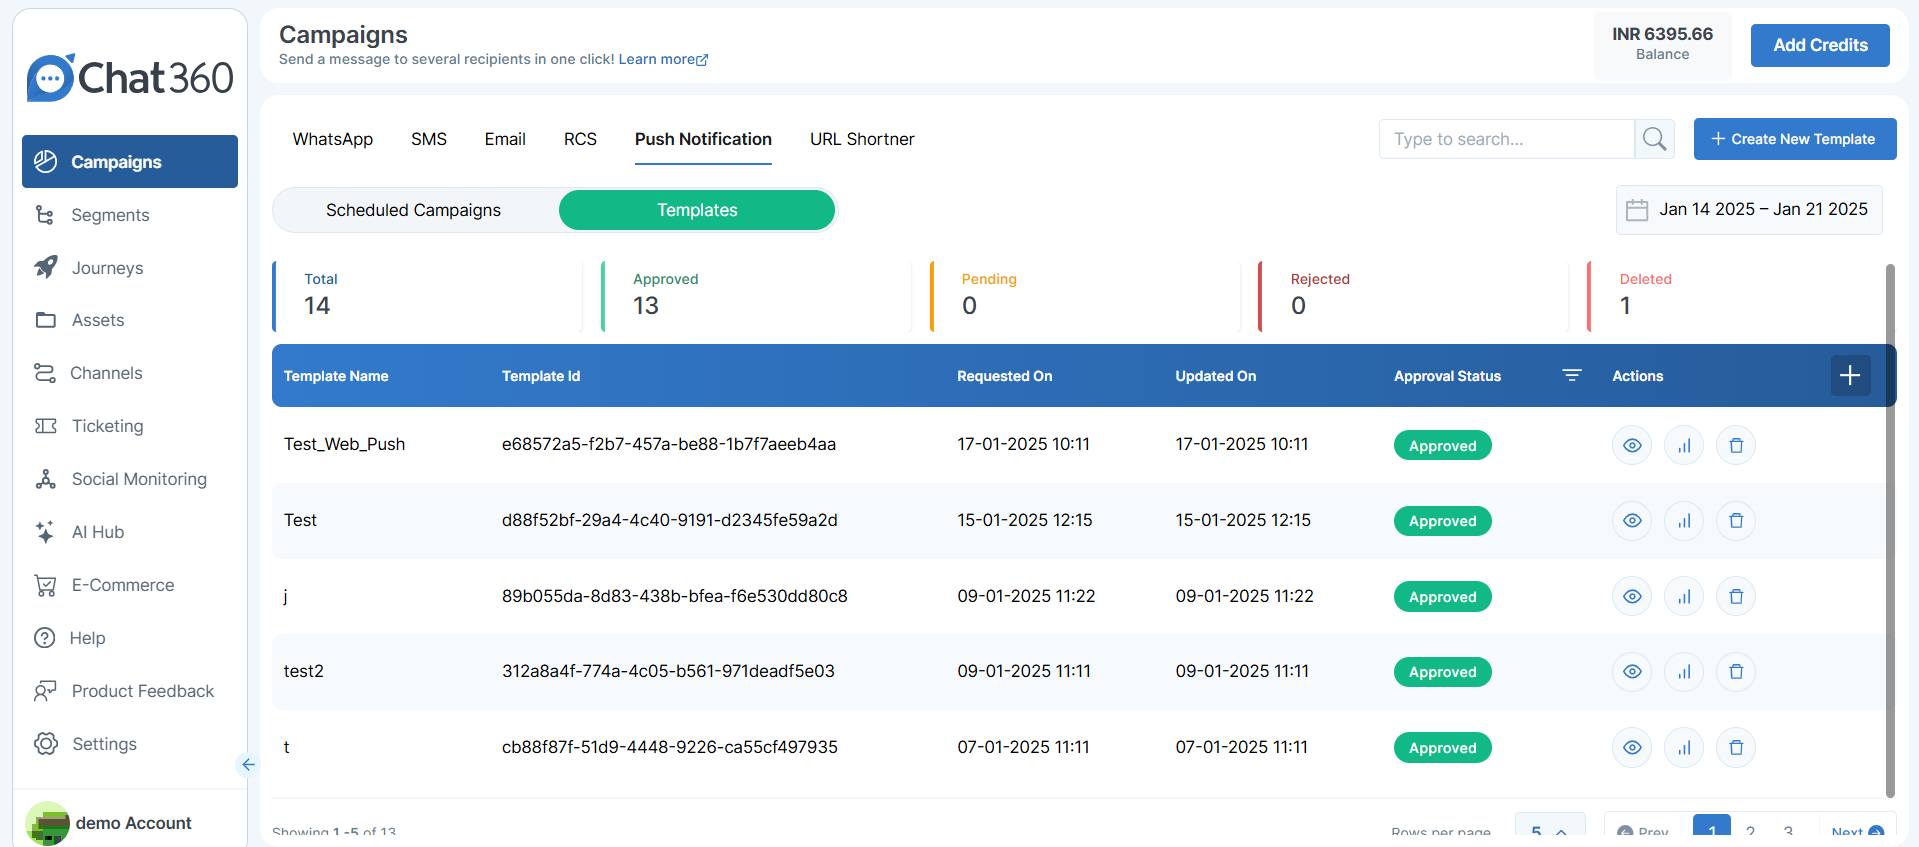
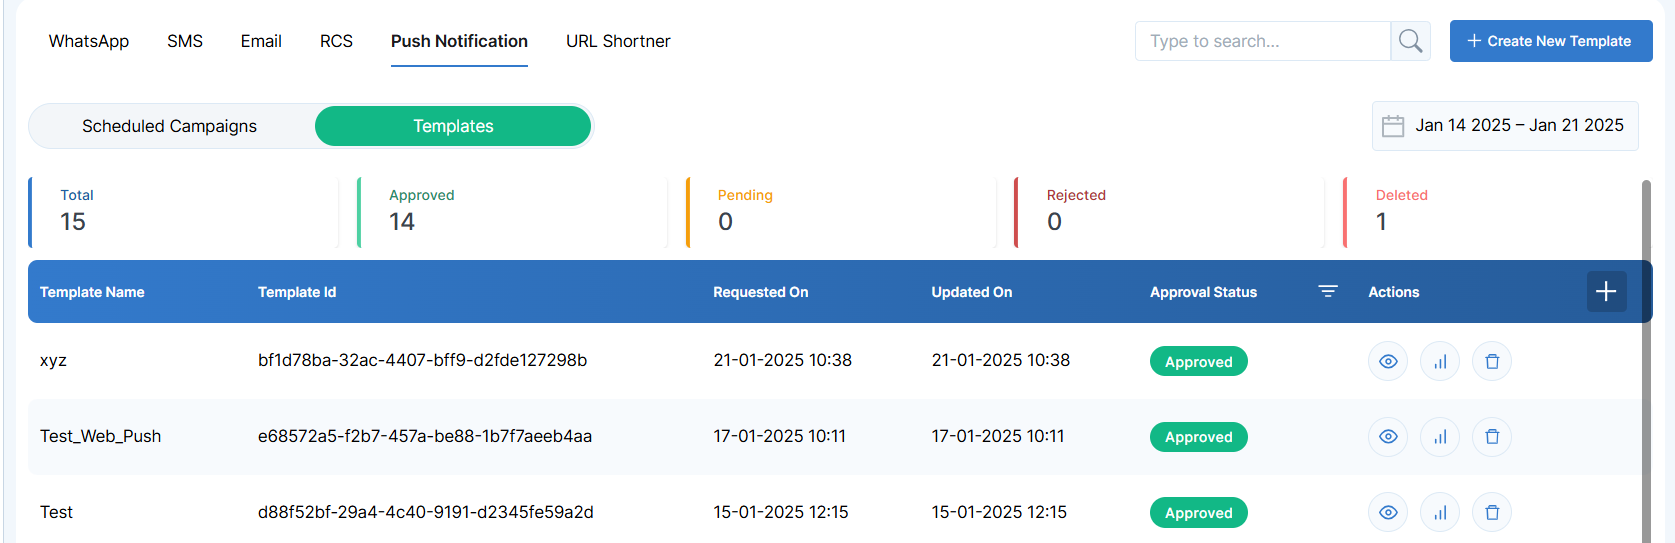
- From the Chat360 side panel, select Campaign, then click Push Notification.
- Click the Create New Template button at the top of the Push Notification screen.
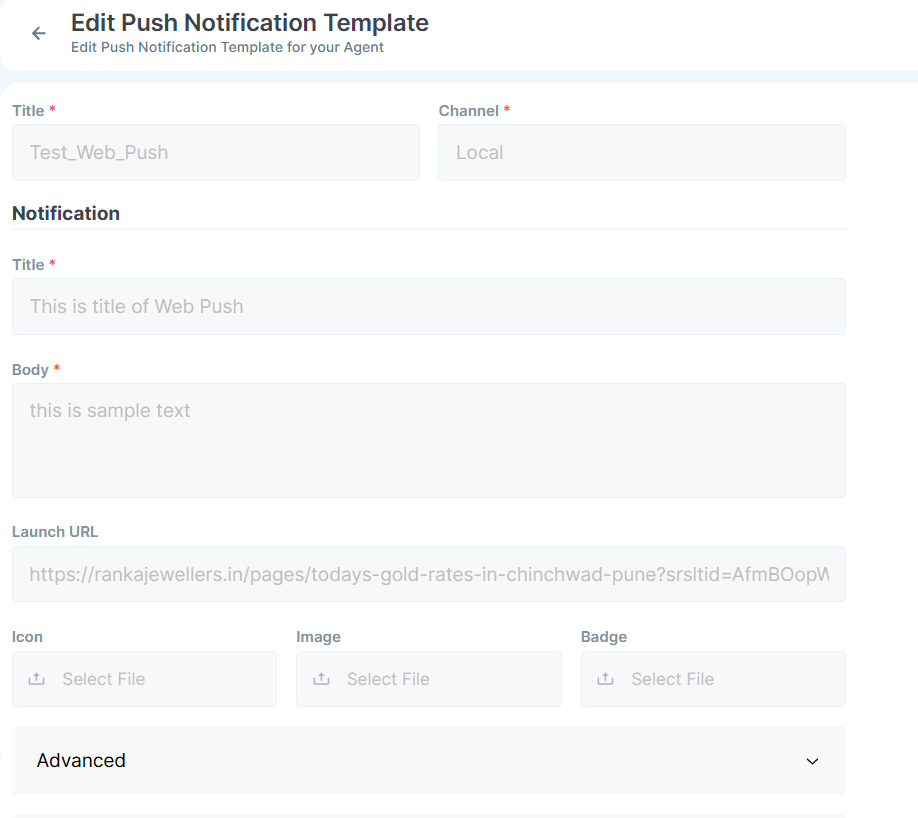
- Template Title: Choose a clear, descriptive name for internal identification.
- Channel: Ensure Web Push is selected.
- Notification Headline: Enter the short, attention-grabbing title that appears in the user’s browser.
- Body Text: Write the main message (e.g., “Your order has shipped!”).
- Launch URL: Specify the link users visit when they click the notification.
- Icon: Upload a 64×64 px icon to display with the notification.
- Image (Optional): Add a larger image for richer visuals.
- Badge: Assign a badge number or small icon (e.g., unread count) for context.
- Click Save, then use the Preview function to verify layout, text, and media.
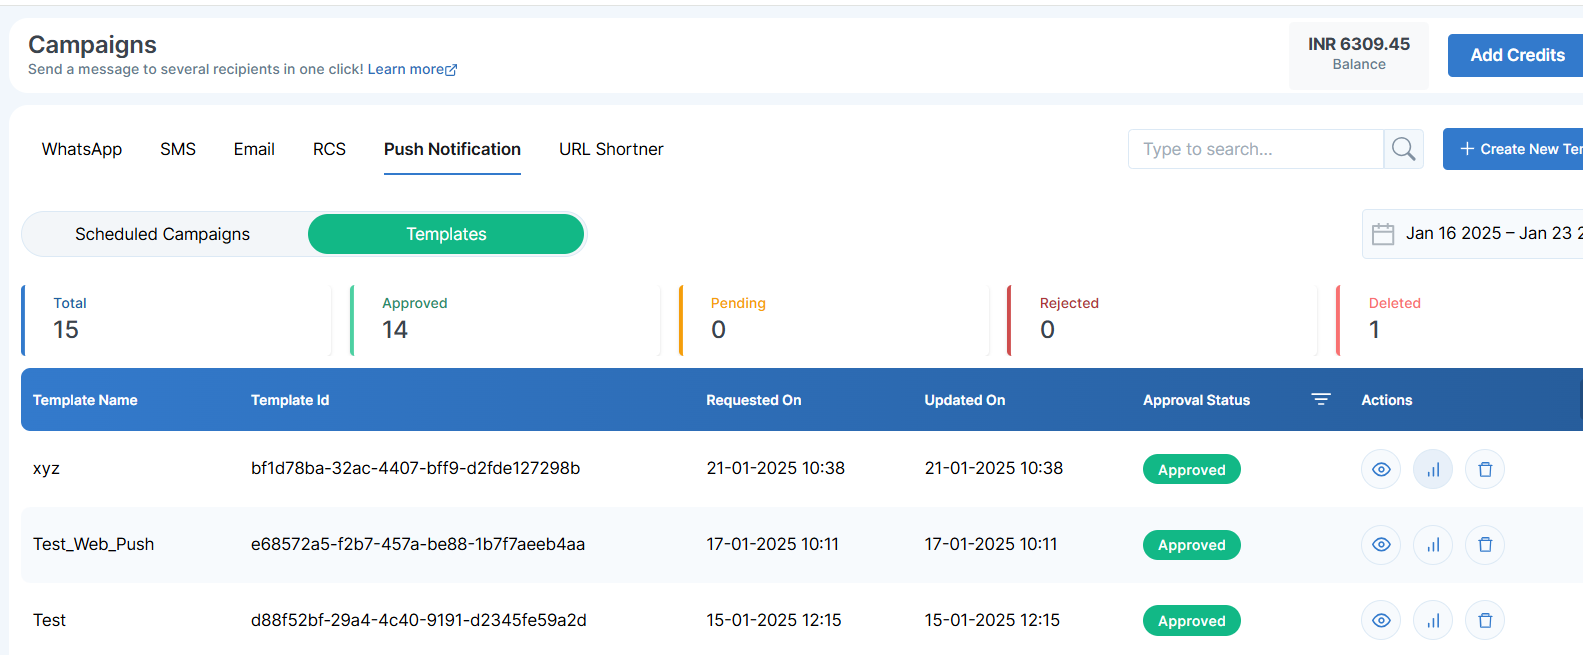
- In the template list view, check the Approval Status column:
- Approved: Ready for campaign use.
- Pending: Awaiting review.
- Rejected: Requires edits—open the template to address feedback.
-
1. Navigate to Campaign → Push Notification
-
3. Enter Basic Details
-
5. Customize Appearance
-
7. Monitor Approval Status
By defining and approving push notification templates upfront, marketing and support teams can deploy consistent, on-brand messages in seconds—improving engagement and response rates across web audiences.
-
Scheduling a Web Push Campaign
Overview:Scheduling a web push campaign lets you deliver time-sensitive notifications to targeted users’ browsers. You can choose immediate delivery or set a future send time, ensuring messages reach audiences at the optimal moment for maximum engagement.
-
Configuration Steps
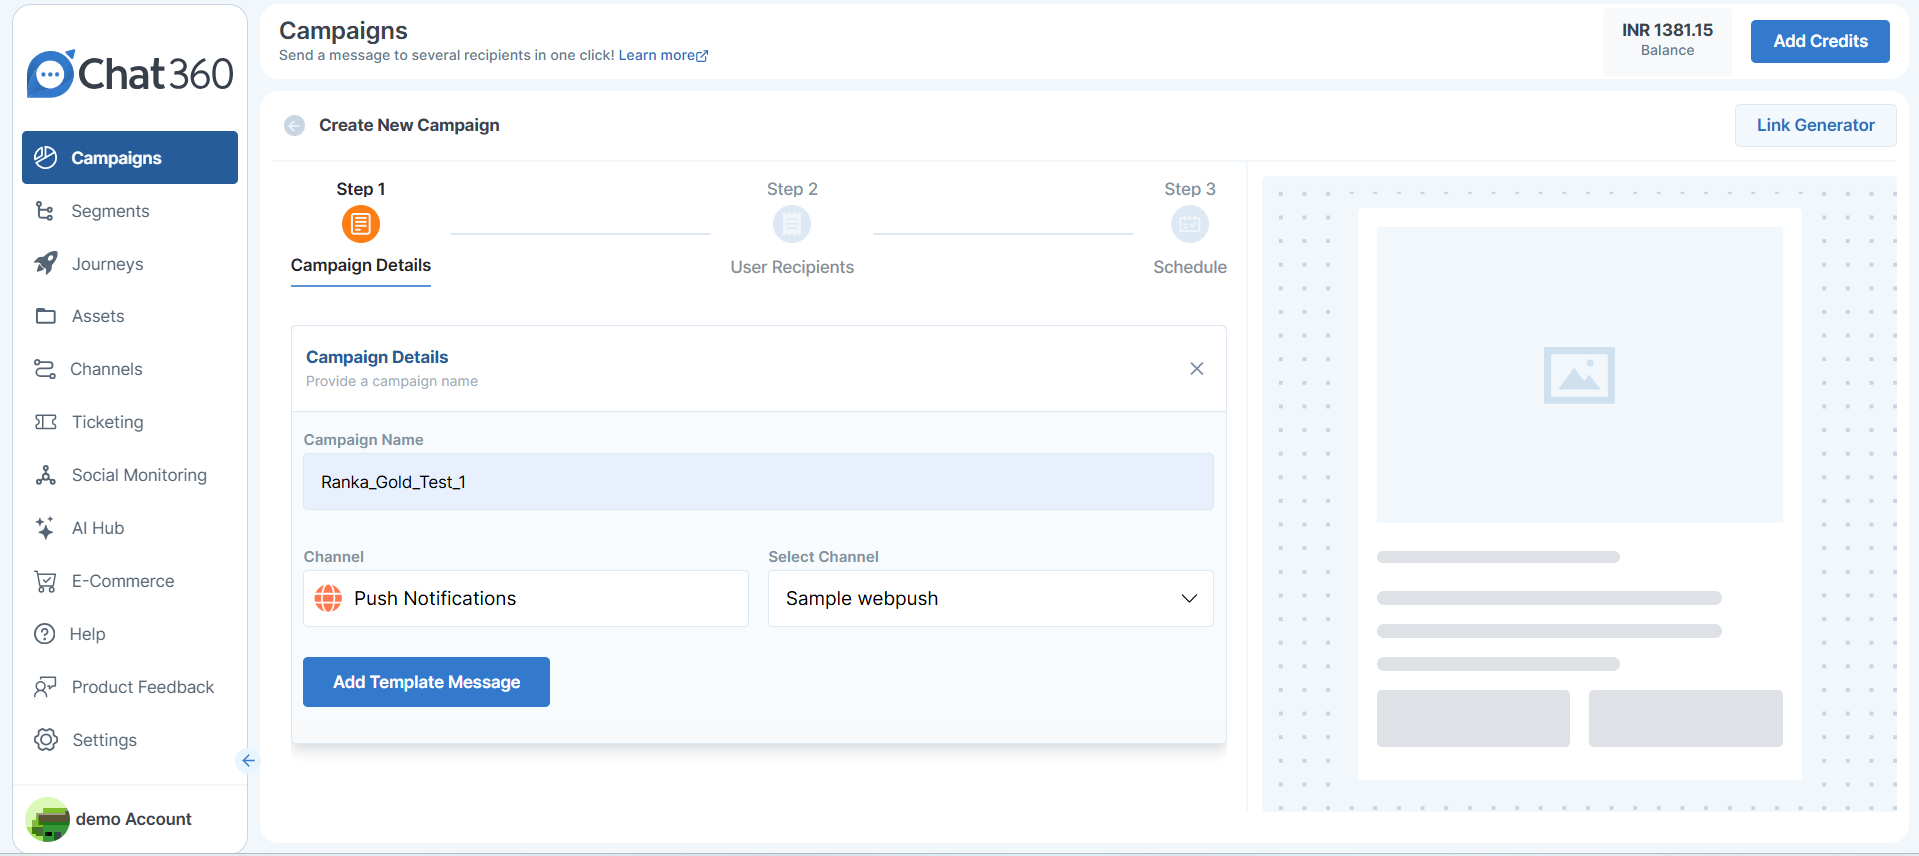
- From the Chat360 side panel, select Campaign, then click Push Notification.
- Click Schedule Campaign, then choose Create New Campaign.
- Campaign Name: Provide a clear, descriptive name (e.g., “Holiday Promo Alert”).
- Channel: Ensure Web Push Notifications is selected.
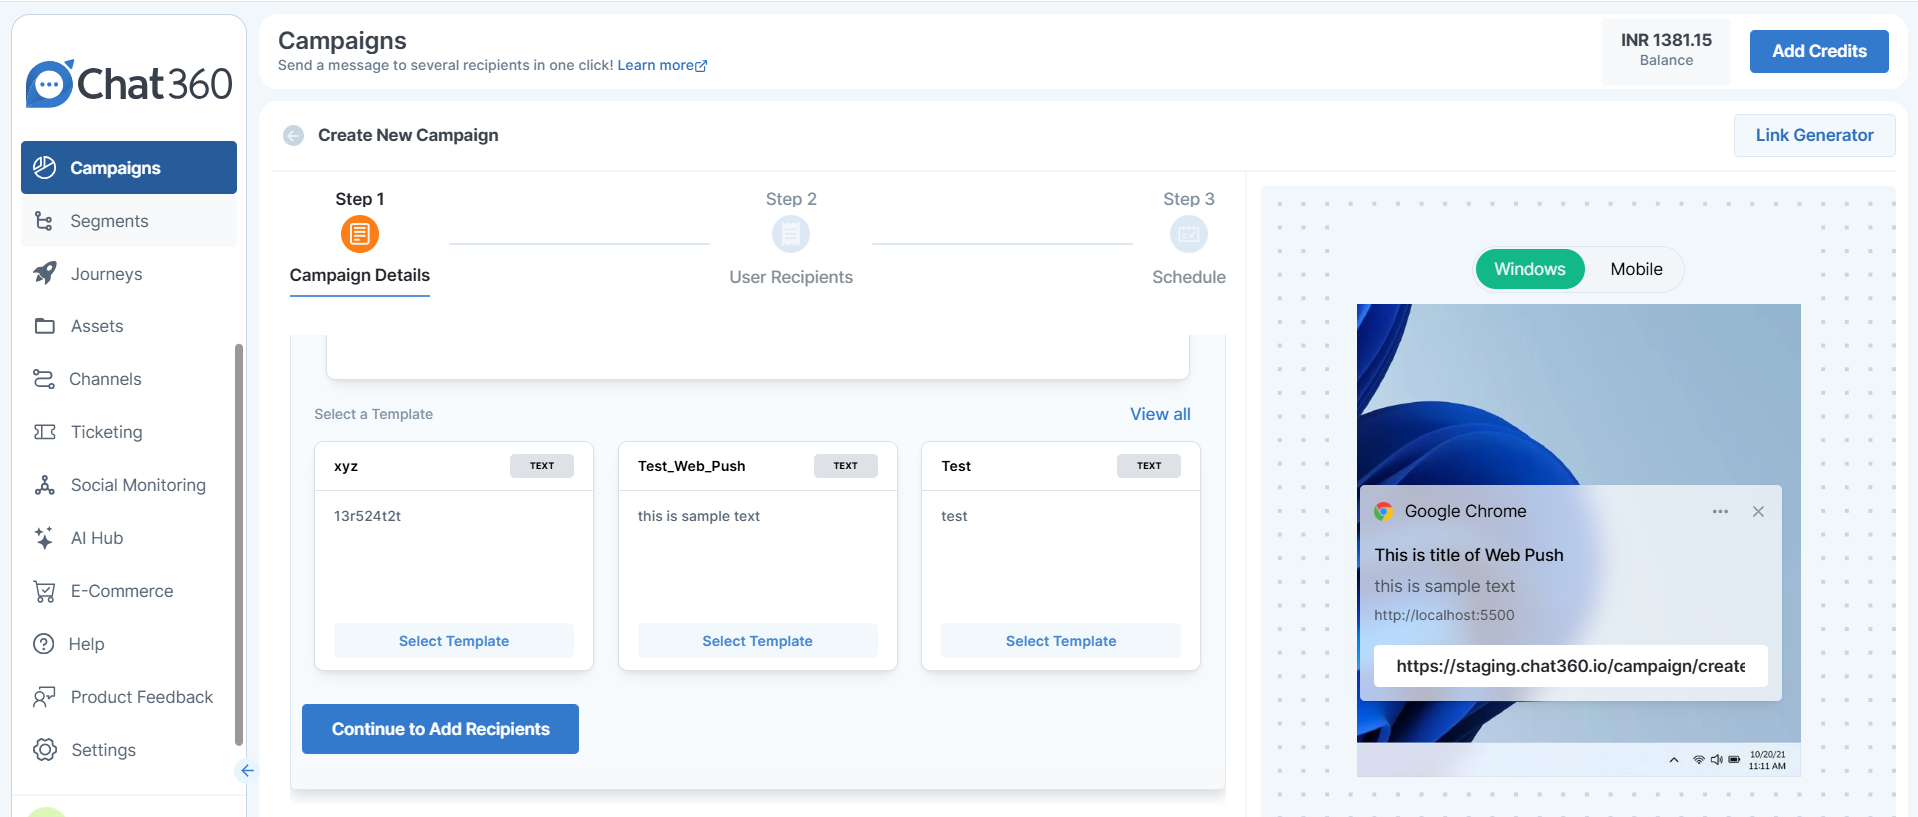
- Template: Choose an existing push template or click Create New Template.
- Preview: Toggle between desktop and mobile views to confirm appearance and copy.
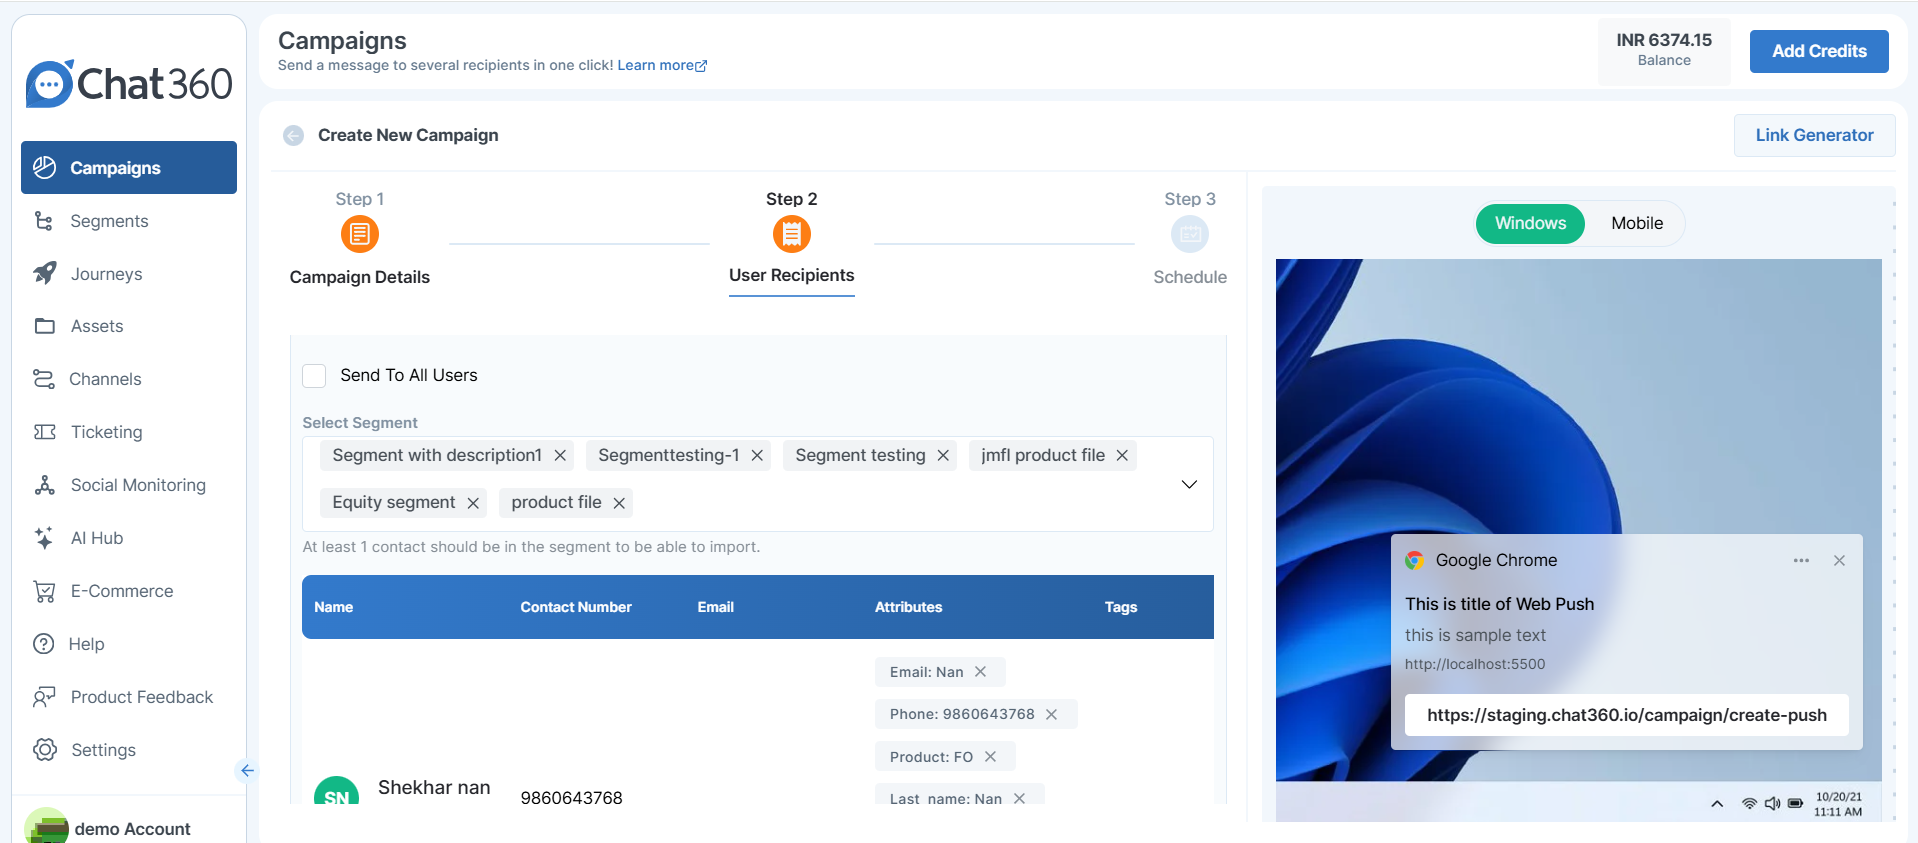
- Audience Selection: Pick a predefined segment or build custom filters (e.g., geography, user behavior, or subscription status).
- Immediate: Select “Send Now” for instant dispatch.
- Timed: Enable “Schedule” and specify date, time, and time zone to align with your audience’s local time.
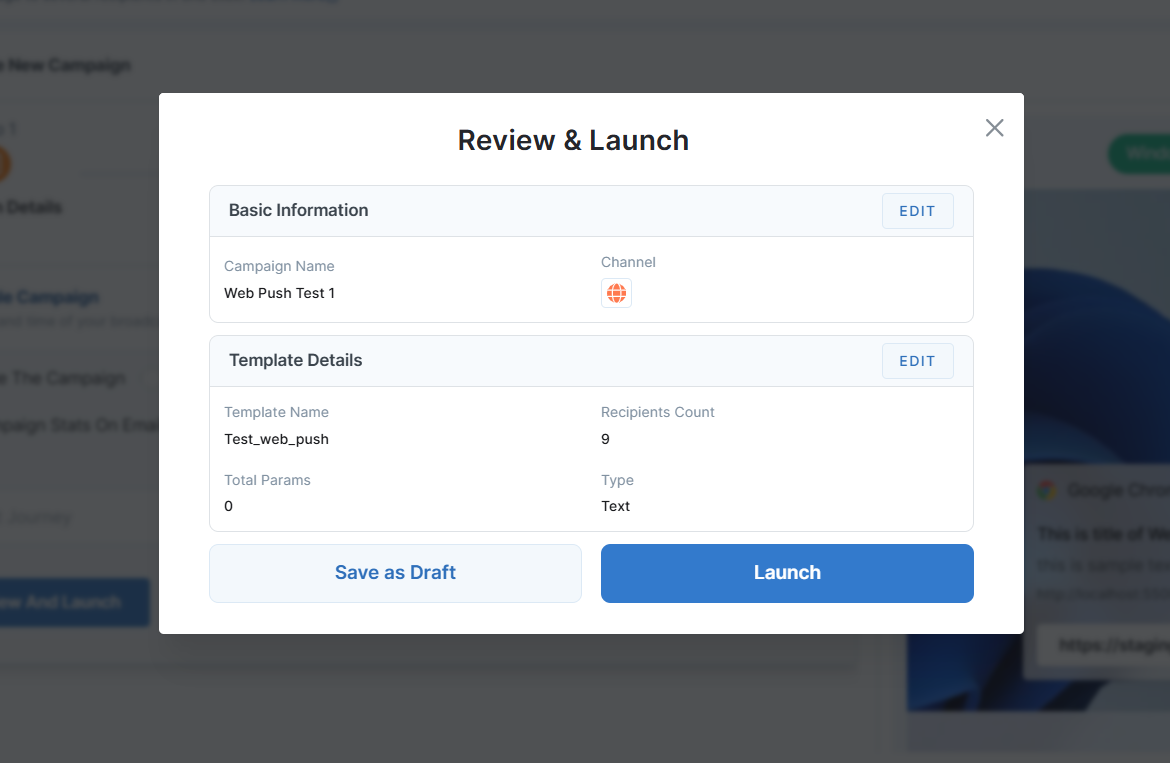
- Verify all settings, content, audience, and schedule details for accuracy.
- Schedule Campaign: Click Launch to finalize.
- Save Draft: Use Save as Draft to revisit or modify later.
-
1. Navigate to Campaign → Push Notification
4. Select & Preview Template
5. Define Recipients
6. Schedule Delivery

7. Review Campaign
-
Use Case Examples
- Flash Sales: Notify subscribers at the exact start of a limited-time promotion.
- Content Alerts: Remind users about new article or video releases at peak viewing hours.
- Event Reminders: Send timely prompts for upcoming webinars or virtual events.
-
Web Push Template Analytics
Overview:
-
How to Access
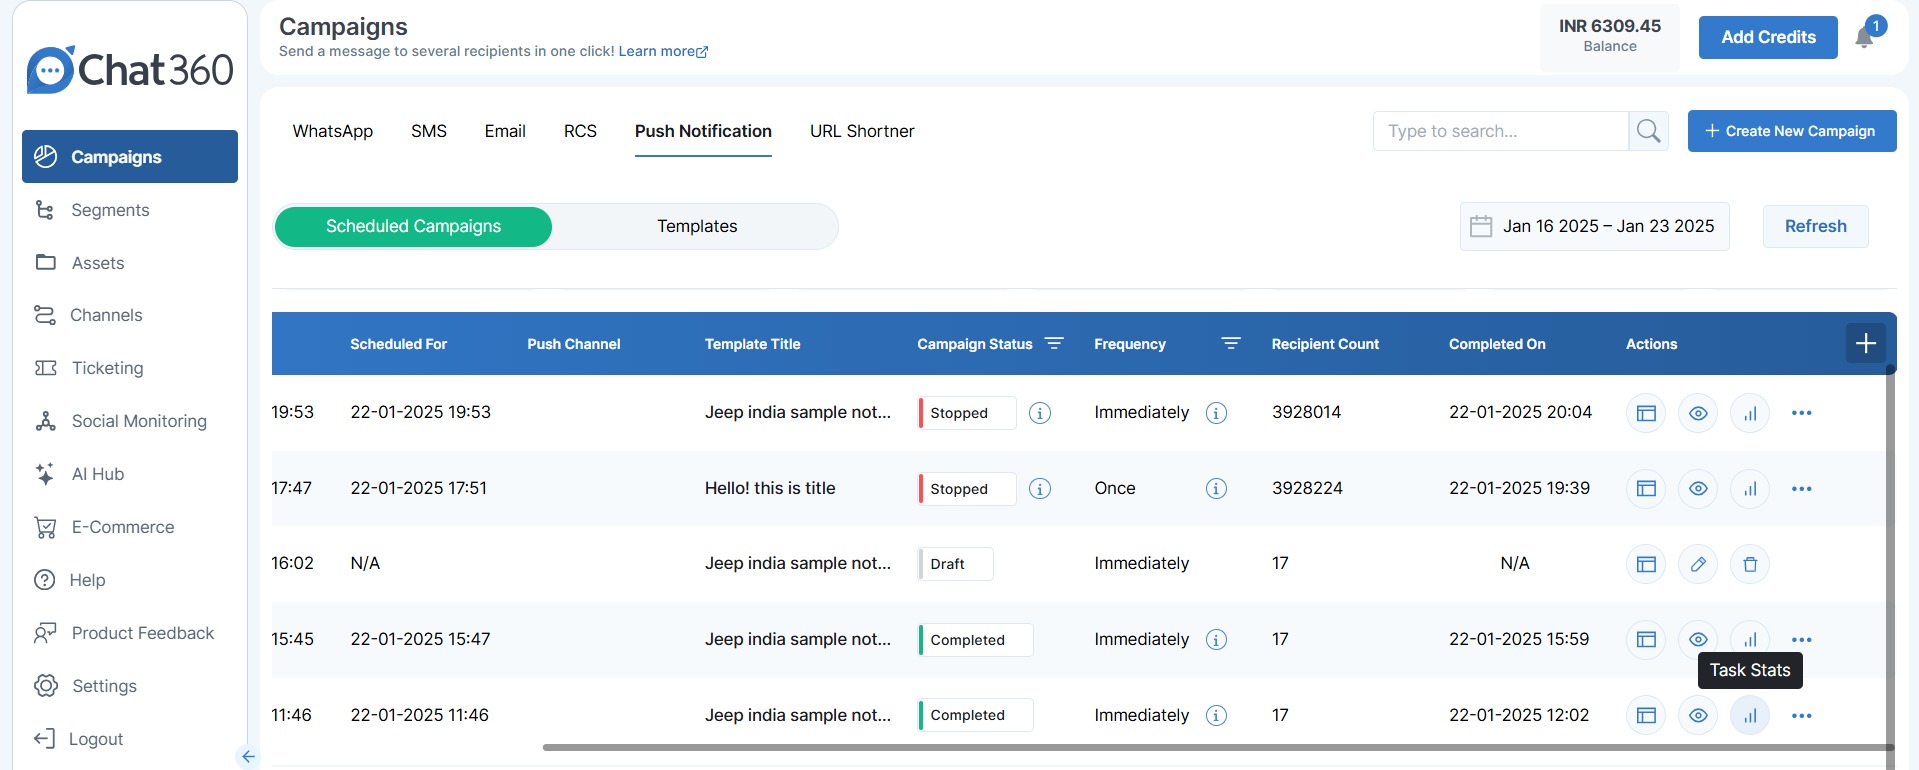
- Navigate to Campaign → Push Notification.
- Under the Scheduled Campaign or Templates section, locate the desired push template or campaign.
- Click Actions → Stats to open the analytics view for that template or scheduled campaign.
-
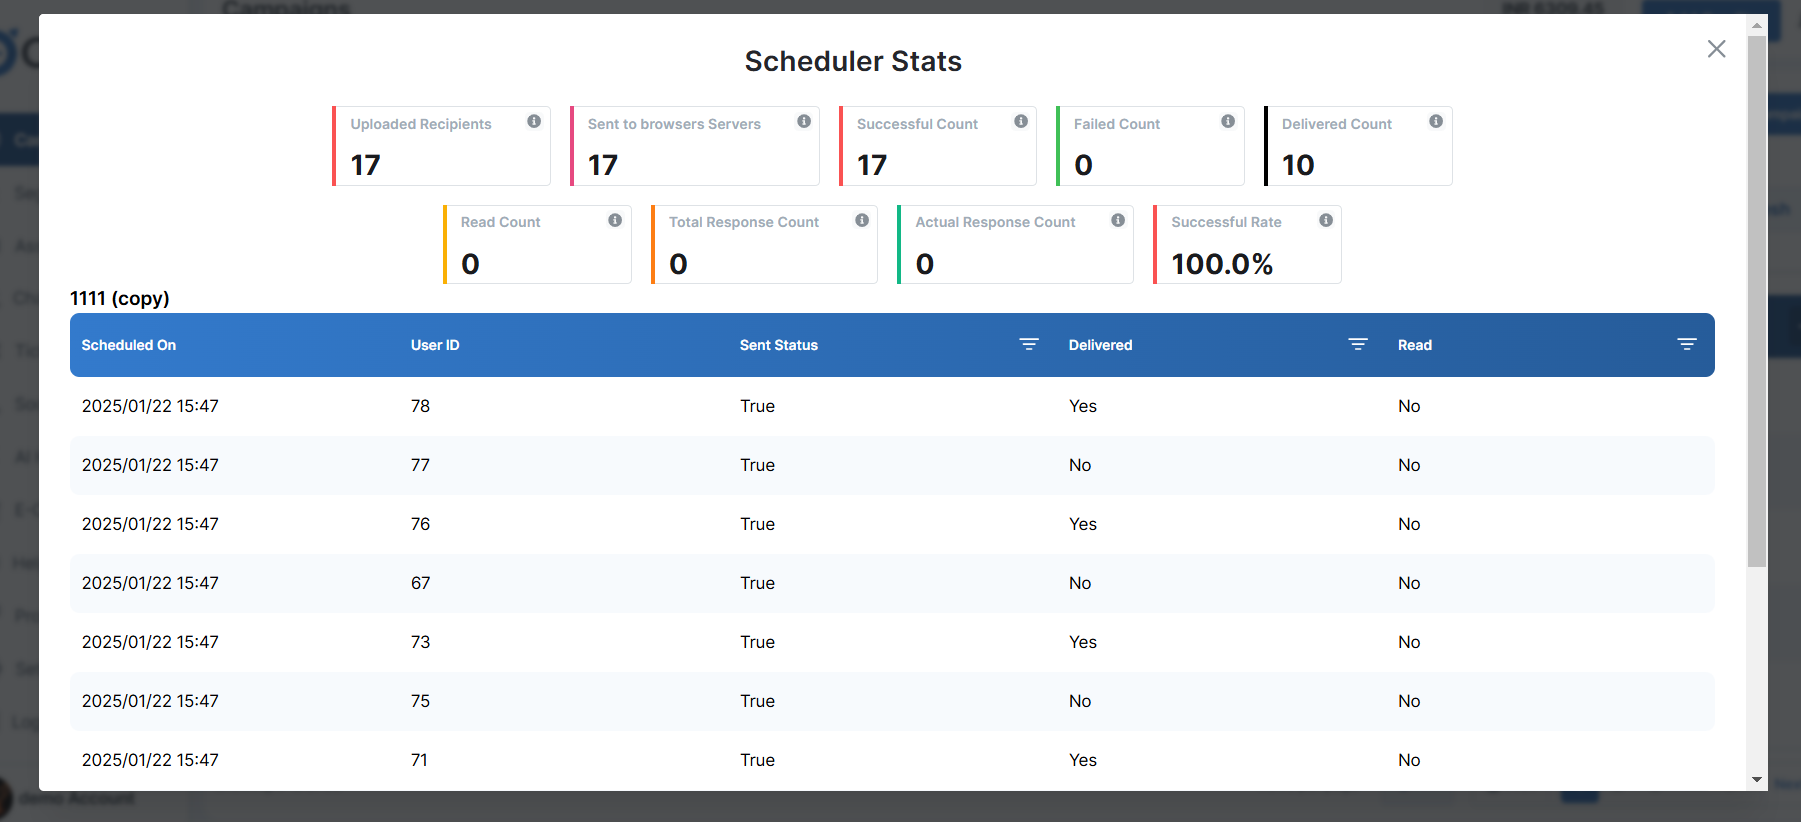
Key Metrics
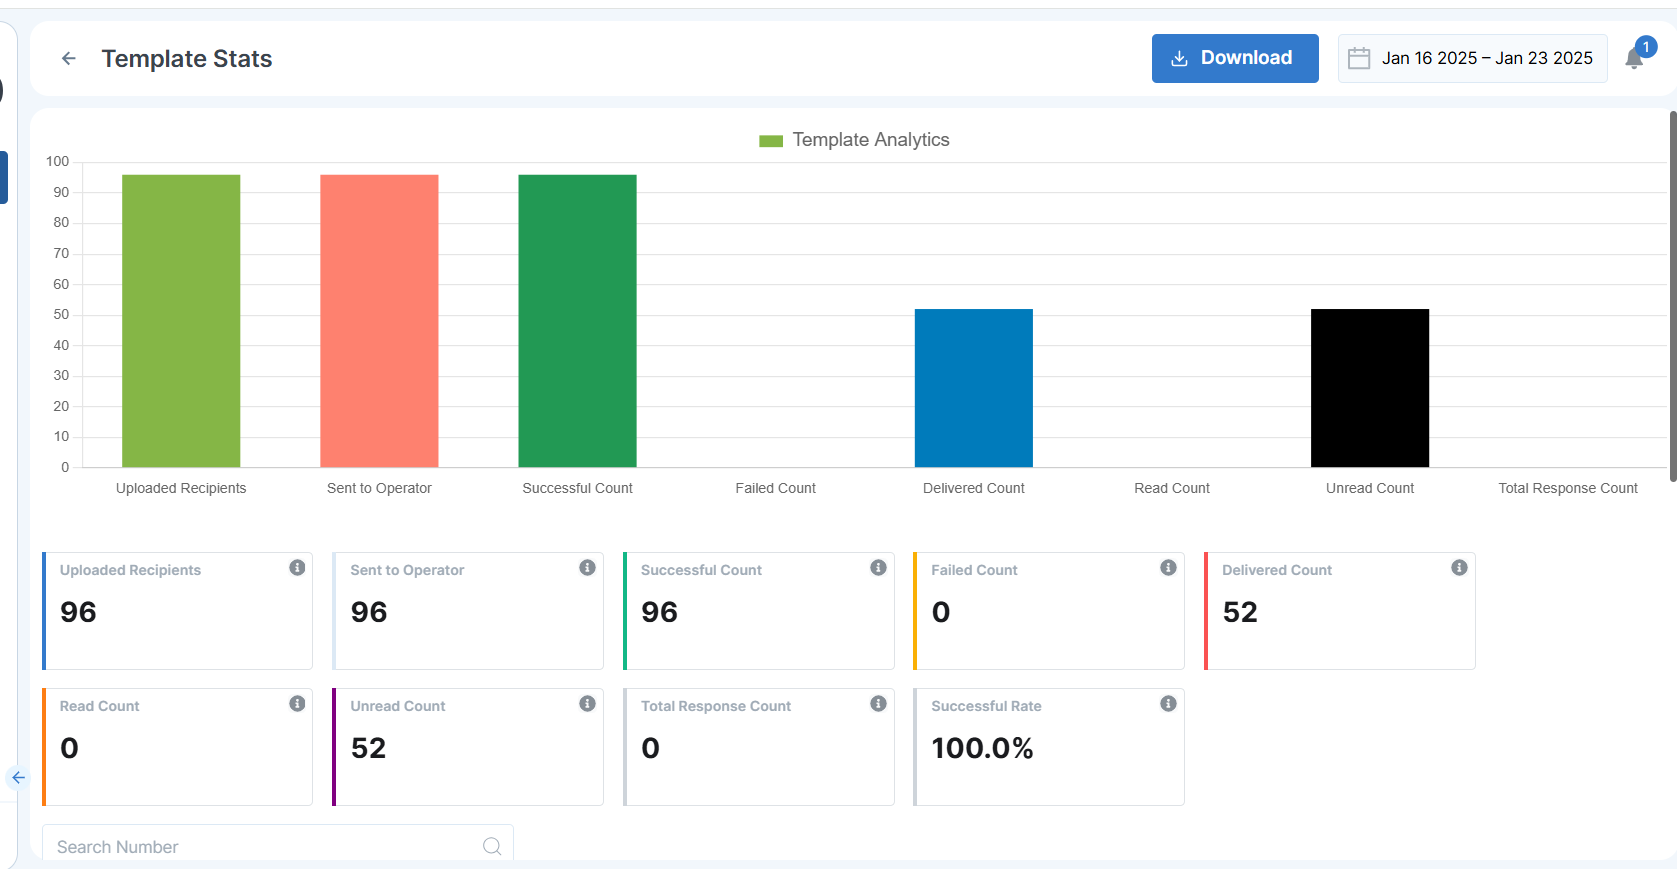
- Uploaded Recipients: Total number of subscribers imported for the template.
- Sent to Operator: Count of notifications dispatched to the push service for delivery.
- Successful Count: Number of notifications successfully delivered to users’ browsers.
- Failed Count: Notifications that could not be delivered due to errors.
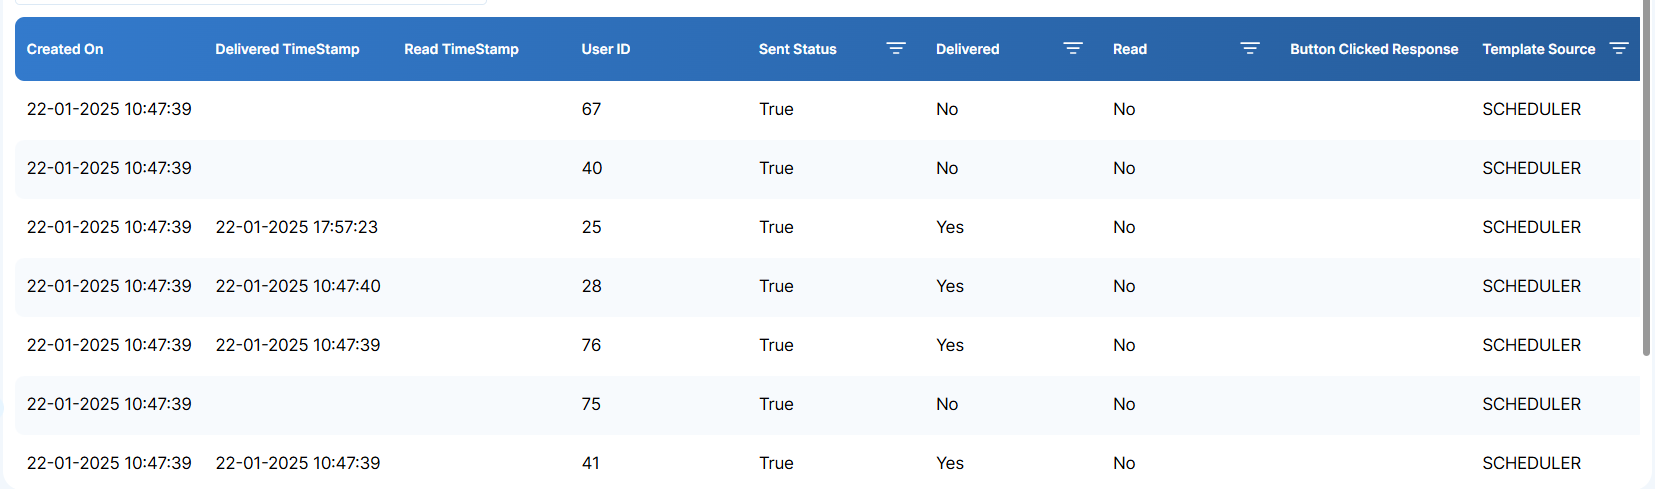
- Delivered Count: Confirmation of notifications received by end-user devices.
- Read Count: Notifications opened or interacted with by users.
- Unread Count: Delivered notifications that remain unopened.
- Total Response Count: Number of user actions (clicks or other engagements) triggered by the notification.
- Success Rate: Percentage of successfully delivered notifications relative to the total sent.
Web Push Template Analytics empowers you to monitor how effectively your push notification templates engage users. By reviewing delivery and interaction metrics, you can refine your messaging strategy and improve overall campaign performance.
-
Visualization & Reporting
- Graphs: Line or bar charts display trends for delivery, open, and response rates over time.
- Date Filters: Adjust the time range to analyze performance on specific dates or periods.
- Export: Download the full analytics dataset as a CSV for deeper analysis or sharing with stakeholders.
-
Use Cases
- Template Optimization: Identify high-performing notification copy and design for future campaigns.
- Engagement Analysis: Compare open and click rates across different user segments to tailor targeting.
- Error Diagnosis: Pinpoint spikes in failure counts to investigate deliverability issues (e.g., expired subscriptions).
By regularly reviewing Web Push Template Analytics, marketing teams can iterate on content, improve user engagement, and maximize the ROI of their push notification efforts.
-
Web Push Scheduled Campaign Analytics
Overview
-
Steps to Access Analytics
- Navigate to Campaigns → Push Notifications→ Scheduled Campaigns.
- Locate your desired campaign and click the Stats option under the Actions tab.
-
Key Metrics
- Uploaded Recipients: Total number of subscribers added for the campaign.
- Sent to Operator: Count of notifications dispatched to the push service for delivery.
- Successful Count: Notifications successfully delivered to users’ devices.
- Failed Count: Notifications that could not be delivered due to errors.
- Delivered Count: Confirmed deliveries arriving on end-user browsers.
- Read Count: Notifications opened or clicked by recipients.
- Unread Count: Delivered messages not yet opened.
- Total Response Count: Number of user interactions (clicks, actions) triggered by the notification.
- Success Rate: Percentage of delivered notifications out of total sent attempts.
The Web Push Scheduled Campaign Analytics feature provides in-depth performance insights for your scheduled web push campaigns. By accessing these analytics, marketers can measure delivery effectiveness, user engagement, and campaign reach over time—enabling data-driven optimization.
-
Use Case
A retail website schedules a weekend sale announcement via web push to 50,000 subscribers. By reviewing “Successful Count” and “Read Count,” the marketing team discovers 40,000 deliveries with a 25% engagement rate—prompting adjustments to notification timing and content for future campaigns.