LeadSquared Integration
-
Overview
Seamlessly connect Chat360’s WhatsApp capabilities with LeadSquared CRM to manage conversations, templates, and messaging directly from your CRM workspace. This integration ensures all WhatsApp interactions—sent and received—are logged as LeadSquared activities, providing a unified view of customer communications without switching platforms.
-
Setup Steps
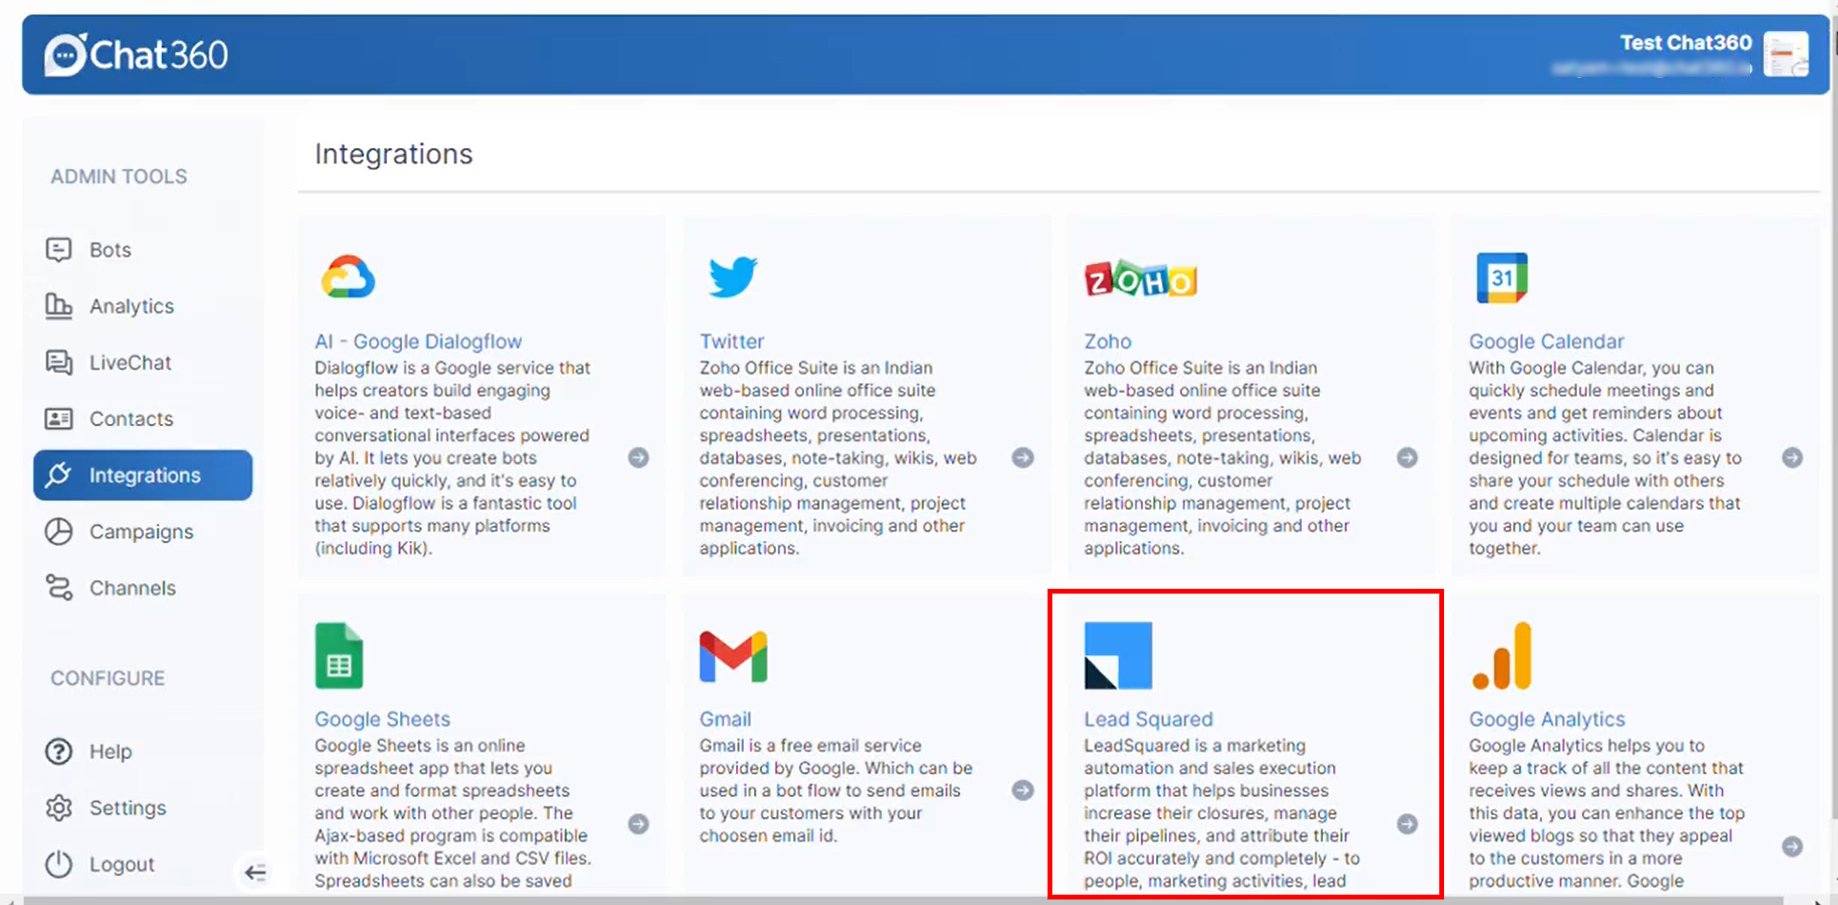
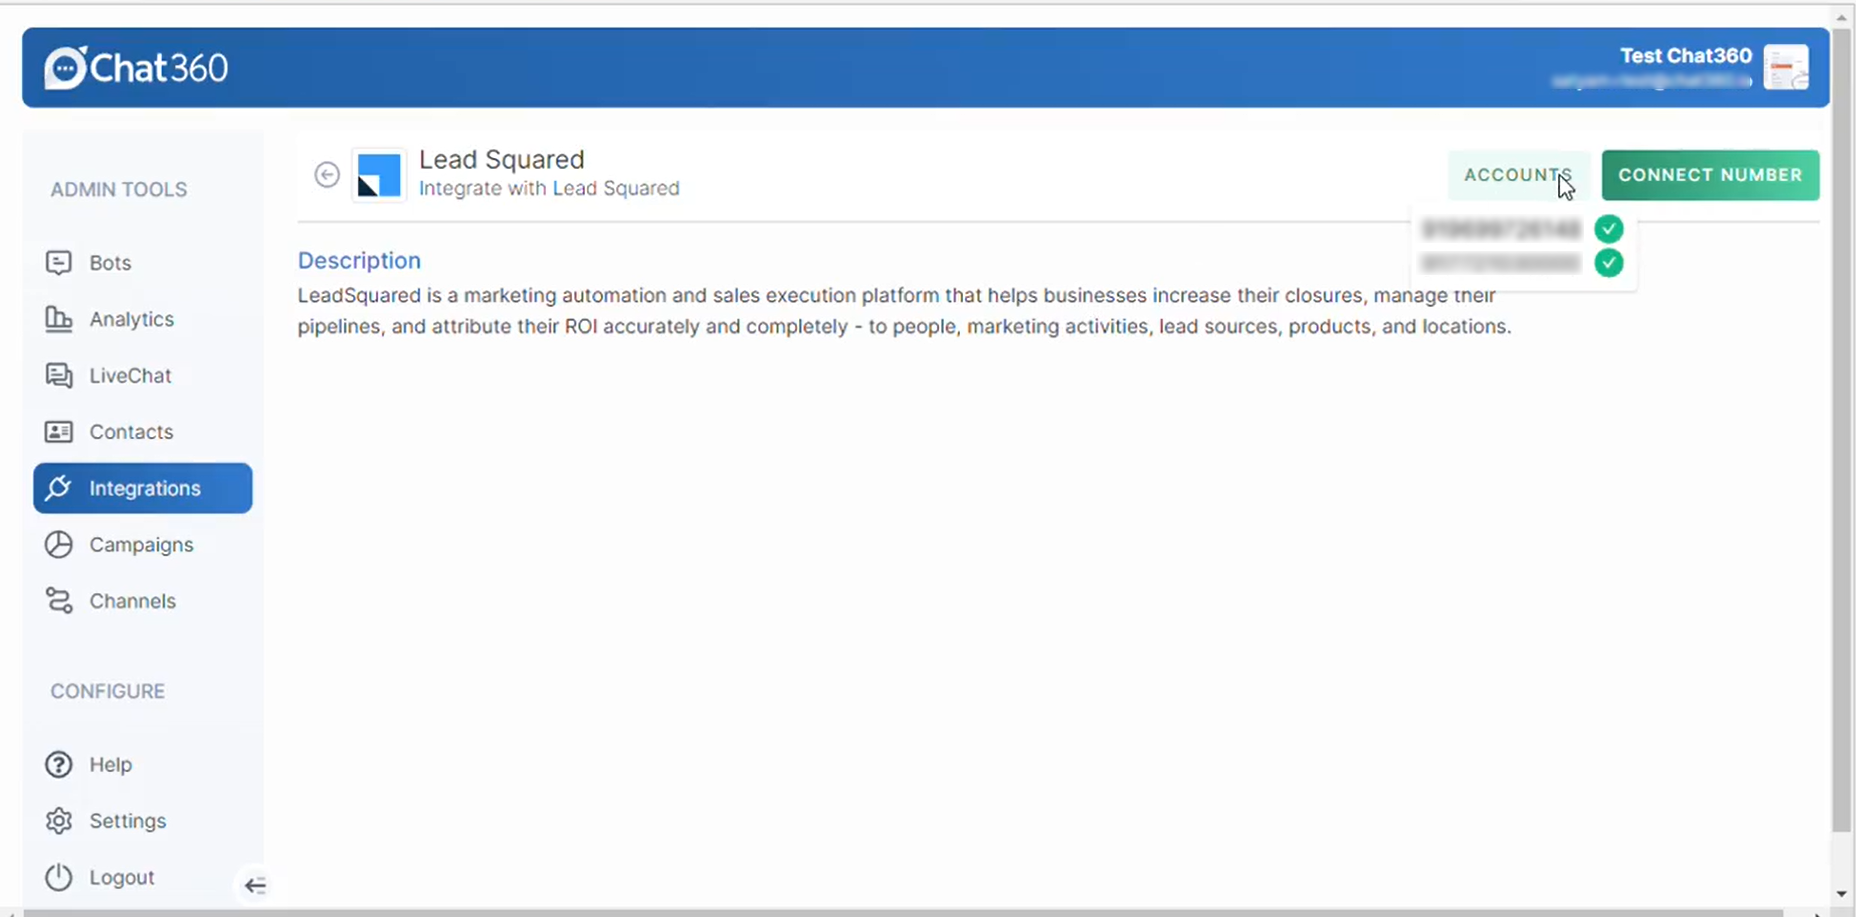
- Loign into app.chat360.io and go to Admin Tools → Integrations.
- Select LeadSquared and click Connect Number.
- Choose the WhatsApp number you wish to link.
-
1. Enable Integration in Chat360
-
2. Install WhatsApp Extension in LeadSquared
In LeadSquared CRM, navigate to Apps → Apps Marketplace.
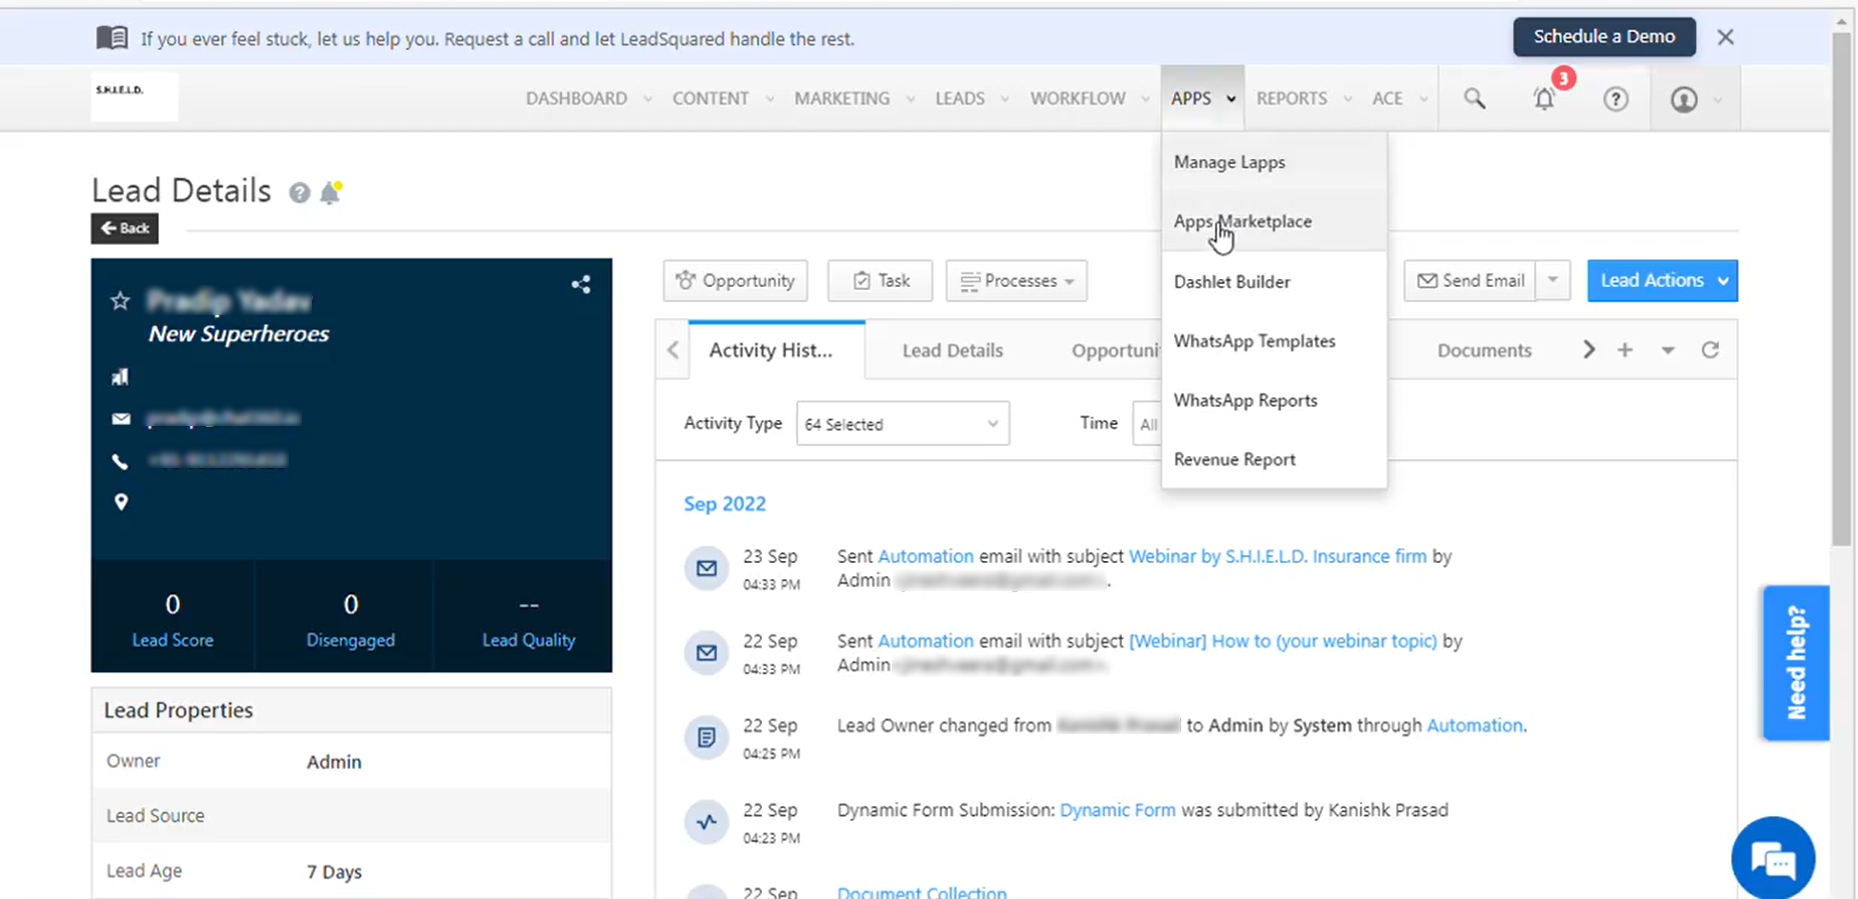
- Search for “WhatsApp Business”, install the extension, then click the settings icon and select Configure.
- Basic Details Enter a friendly integration name and description. Click Next.
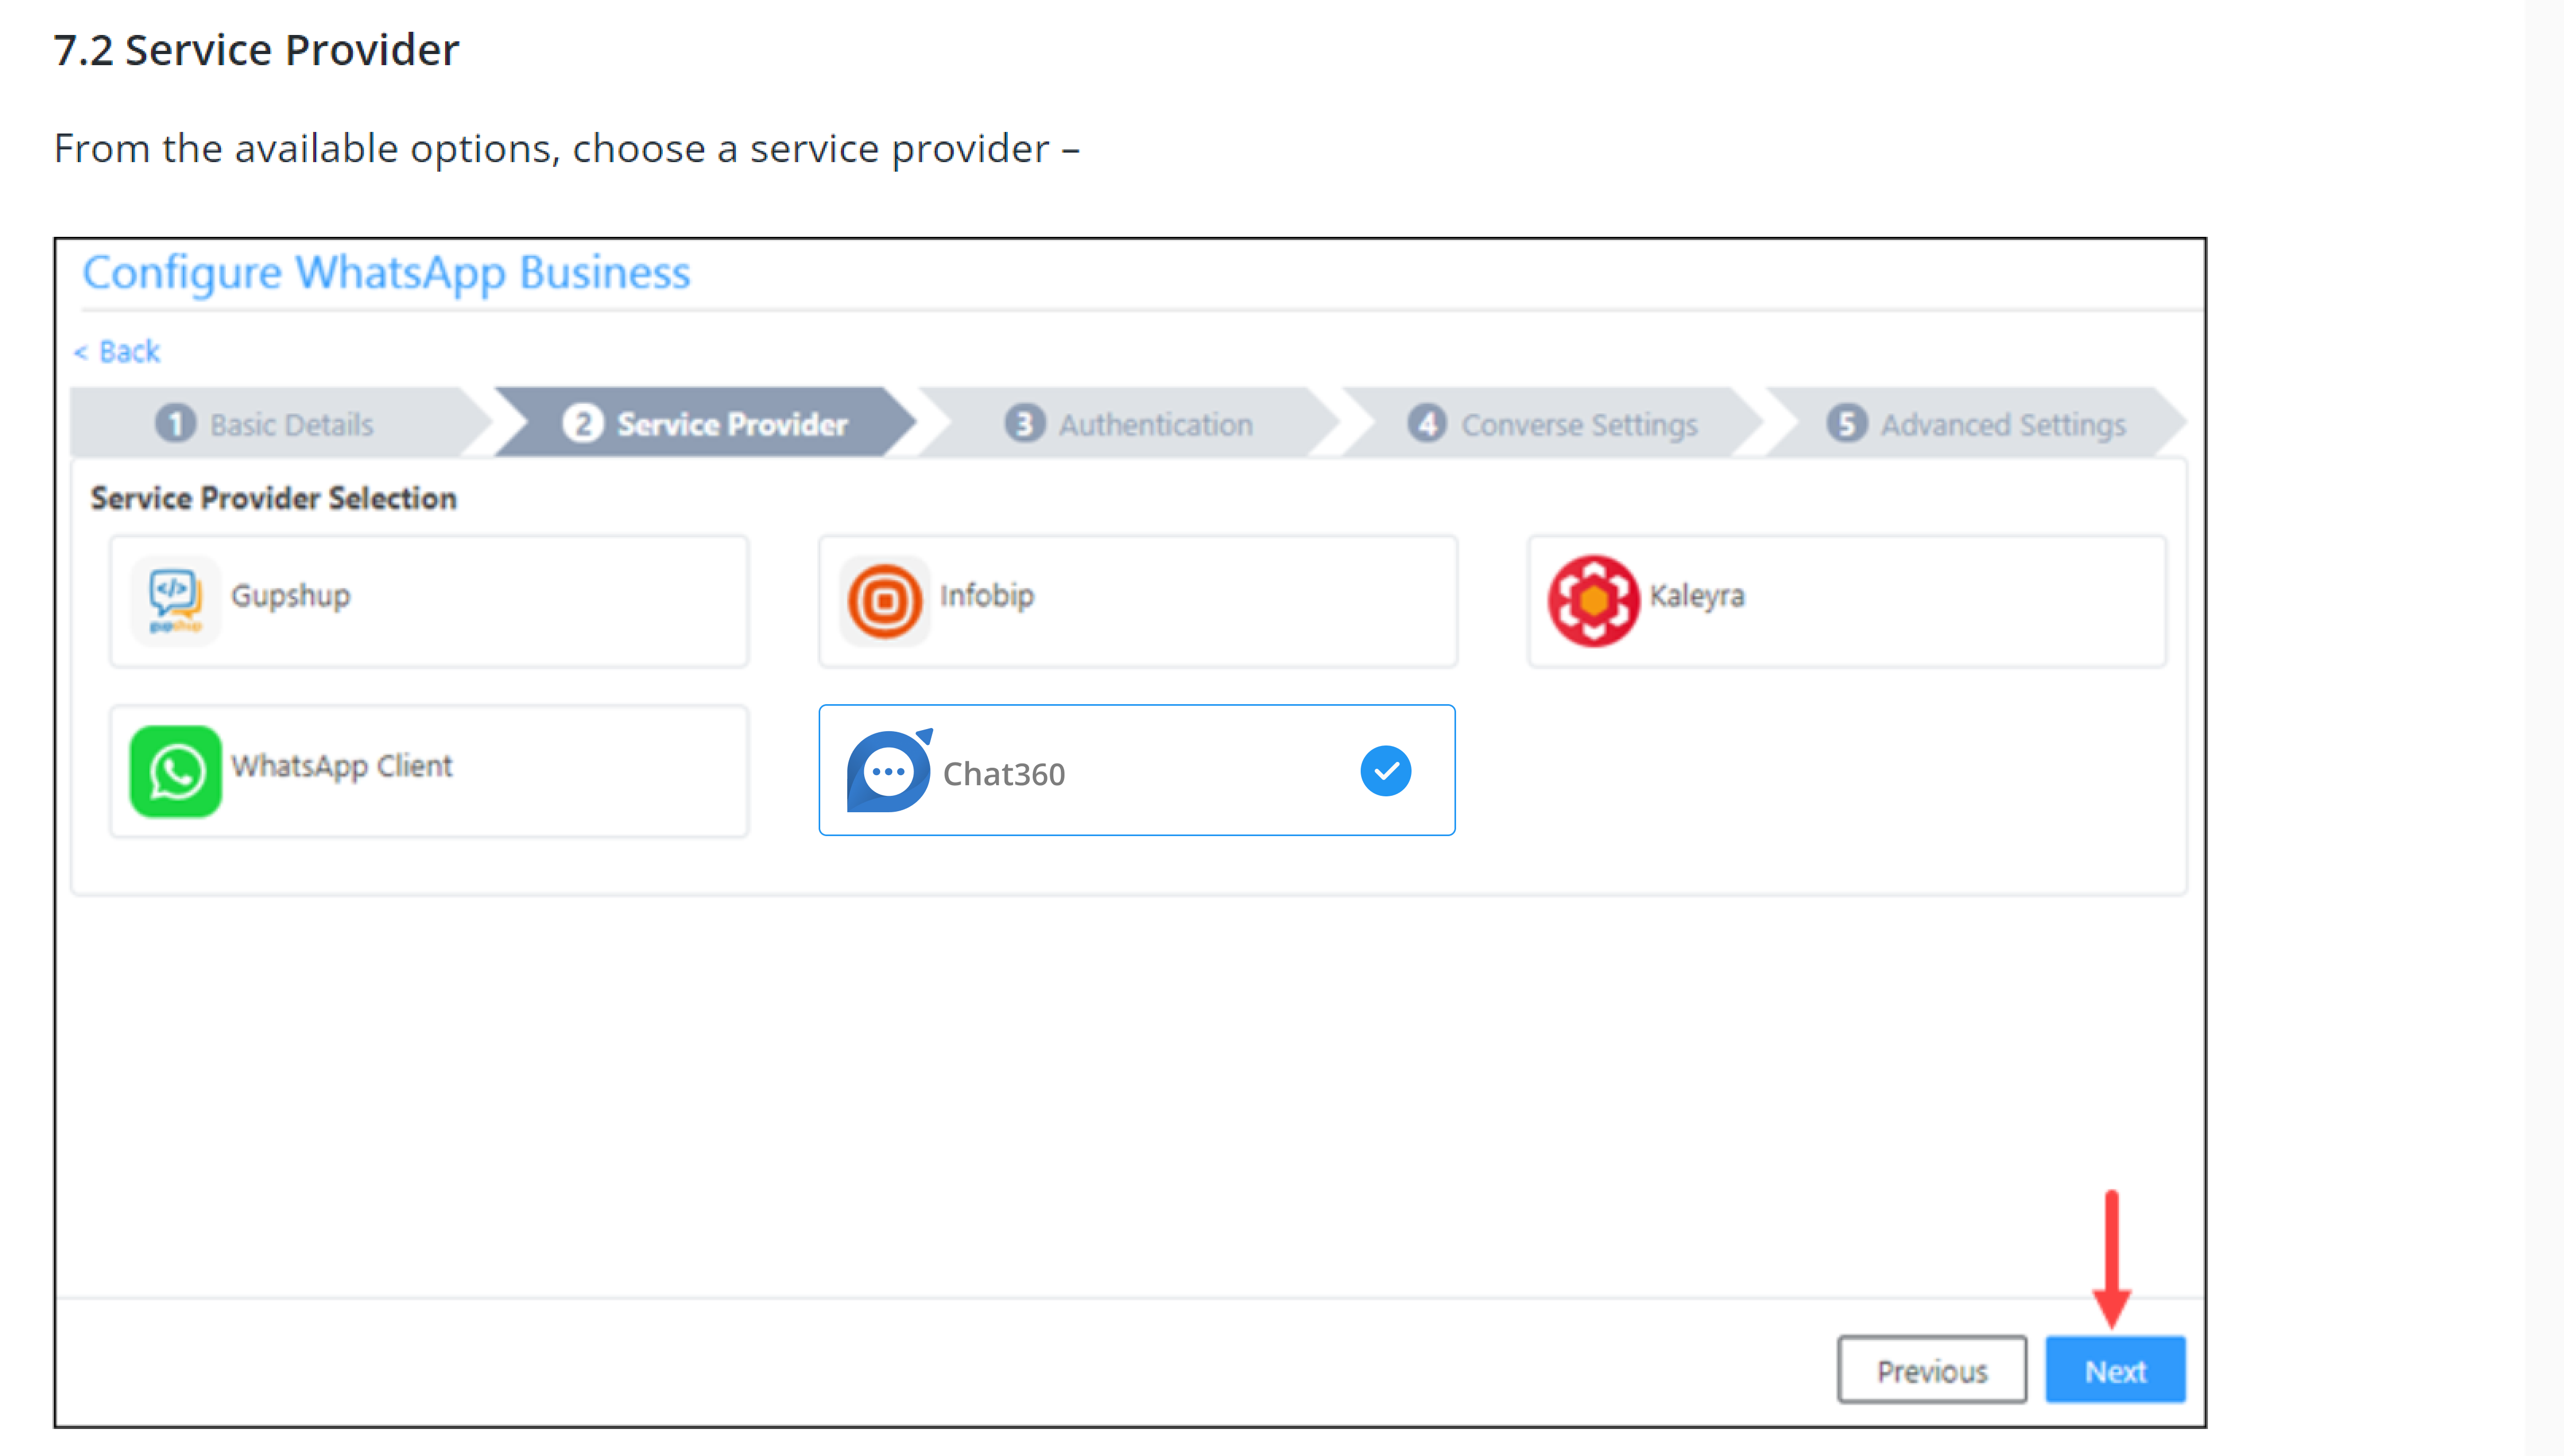
- Service Provider Choose Chat360 from the dropdown and click Next.
-
3. Configure Basic & Service Provider Details
-
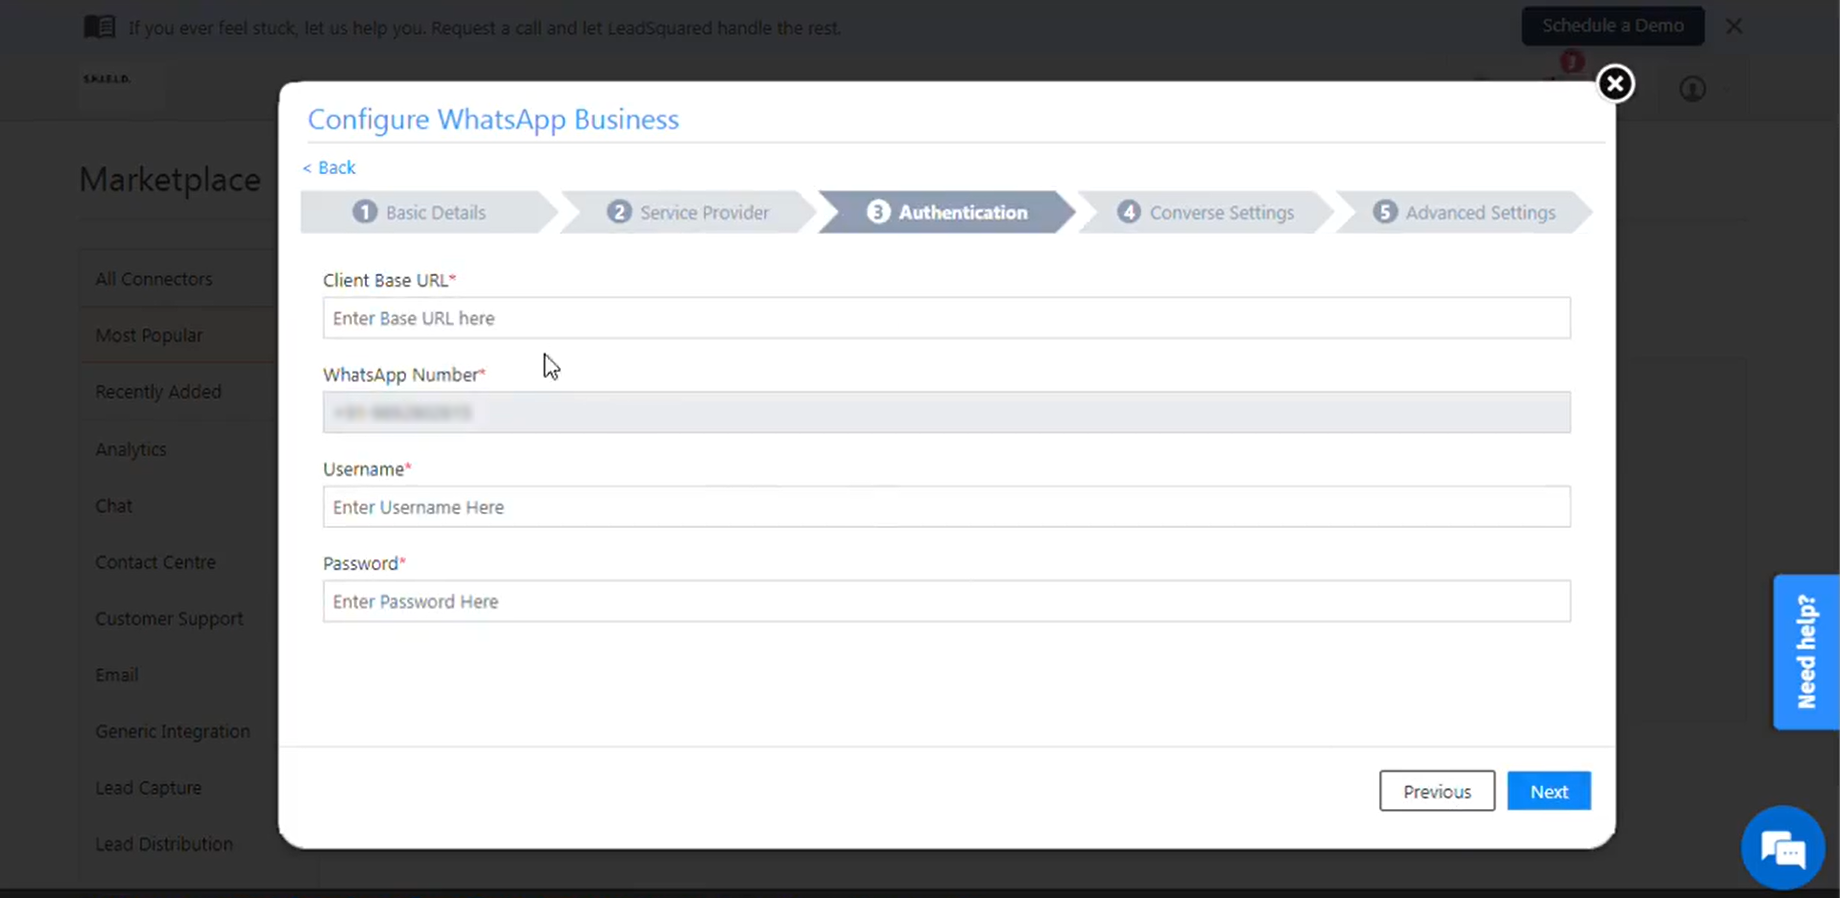
4. Authenticate Chat360 Account
- In the Authentication section, input your Chat360 API Key and Secret. Click Next...
-
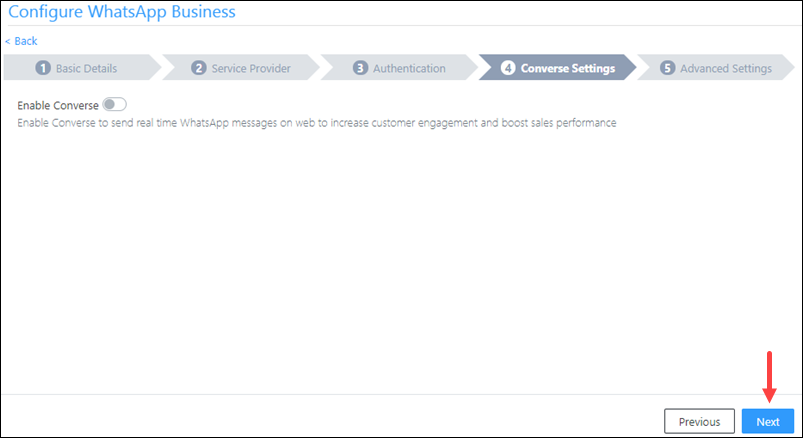
5. Set Converse Settings
- Define how incoming and outgoing messages map to LeadSquared activities and specify any default reply behaviors.
-
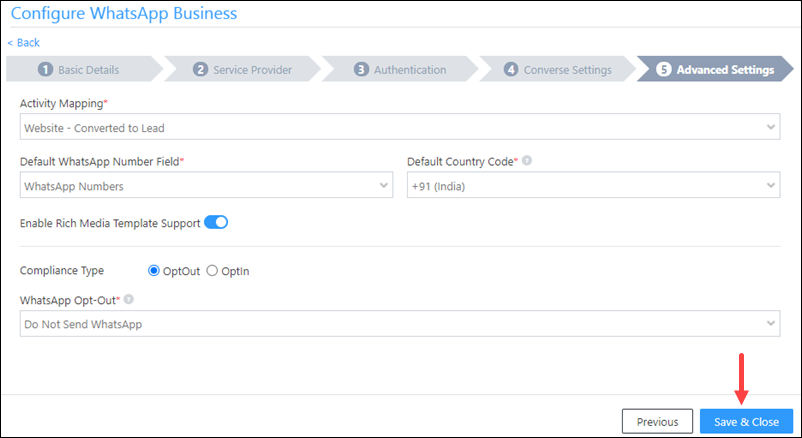
6. Adjust Advanced Settings
- Activity Mapping - Select a LeadSquared activity field to log every WhatsApp message.
- Default Number Fields – Choose which phone number field to use when sending messages.
- Default Country Code – Set a fallback country code for numbers missing a code.
- Rich Media Support – Toggle on to allow images, documents, and buttons in messages.
- Compliance Type – Select Opt-In or Opt-Out lead field to respect user preferences.
-
7. Finalize Integration
- Review all settings and click Save & Close. The integration is now active.
-
Key Benefits
- Unified Communication Logs: Set a fallback country code for numbers missing a code.
- In-CRM Messaging: Send and receive WhatsApp messages without leaving LeadSquared, streamlining agent workflows.
- Automated Activity Mapping: Configure which CRM fields capture message data for accurate reporting.
- Rich Interaction Support: Include media and interactive templates thanks to Chat360’s rich-media toggle.
- Compliance Management: Enforce opt-in/opt-out preferences at scale directly within LeadSquared.
-
Use Cases
-
1. B2B SaaS: Lead Nurturing via Automated WhatsApp Follow-Ups
- How It Works:
- A lead fills out the demo request form, captured in LeadSquared.
- Chat360 is triggered via LeadSquared’s WhatsApp extension, automatically sending:
- A confirmation template: “Thanks for booking a demo. Our team will reach out soon.”
- A follow-up message 24 hours later with product brochure or FAQs.
- Chat360 logs this interaction as an activity in the LeadSquared CRM under the lead timeline.
- Outcome:
-
2. EdTech: Instant WhatsApp Welcome Messages for New Enquiries
- How It Works:
- New leads entering LeadSquared through a landing page are auto-synced.
- Based on lead stage or source, a WhatsApp message is triggered via Chat360:
- “Hi [Name], thanks for showing interest in our Python course. Here’s a quick overview: [PDF]”
- The entire conversation is mapped to the lead’s activity feed in LeadSquared.
- Outcome:
-
3. Healthcare: Appointment Confirmation and Rescheduling on WhatsApp
- How It Works:
- Appointment bookings are entered into LeadSquared.
- Chat360 sends:
- Appointment confirmation WhatsApp message.
- A message template with options: “Confirm”, “Reschedule”, “Cancel”.
- Lead's action (e.g., choosing “Reschedule”) is recorded in LeadSquared as a lead activity, and the CRM can trigger follow-up tasks accordingly.
- Outcome:
-
4. BFSI: EMI Reminder Campaigns with Compliance Tracking
- How It Works:
- EMI schedules are uploaded into LeadSquared.
- A scheduled campaign is configured using Chat360, which sends personalized WhatsApp EMI reminders.
- Compliance field is used in LeadSquared to track opt-in/out preferences.
- Chat360 logs message delivery, reply, and opt-out activity back into the lead's CRM profile.
- Outcome:
A SaaS product company wants to nurture demo leads using automated follow-up messages on WhatsApp.
Streamlines lead nurturing, improves engagement rates, and ensures every lead gets timely follow-ups without manual effort.
An online learning platform wants to engage new inbound leads immediately with course details.
Enhances user experience with real-time communication and increases course sign-up rates by reducing delay in engagement.
A clinic using LeadSquared wants to automate appointment confirmations and allow rescheduling via WhatsApp.
Reduces no-shows, improves convenience for patients, and provides full visibility of interactions in the CRM.
A loan servicing company wants to send EMI payment reminders and track opt-in compliance.
Reduces no-shows, improves convenience for patients, and provides full visibility of interactions in the CRM.